.
That’s it! You are ready to go!
This is just a *simple* example of Slack Shortcuts using YepCode but we could add more logic to it. For example, it would be awesome to ask the email to send the thread, this can be done using [Slack Bolt](/docs/integrations/slack-bolt) and [Slack modals](https://api.slack.com/block-kit/building).
Thank you for reading :) and…Happy coding! 😉
# Sync your Apollo.io contacts with your database using YepCode
> We have created an integration to retrieve information from an eCommerce database and then upload it to Apollo.io, a sales intelligence and engagement platform.
If you want to **sync your Apollo.io with your database**, you will probably run into some issues that may make this task not as simple as it seems. Especially if you want to **automate this process to keep this database up to date** as new contacts are made.
In this case, we’ll show you a complete implementation of a process inYepCode, **from account creation to fully working**.
The process will consist of creating an integration that **retrieves information from an eCommerce database** (in this case, a **MySQL server**) and using a **REST API, uploading the retrieved information to Apollo.io.**
### **But first of all, what is Apollo.io?**
[**Apollo.io**](https://www.apollo.io/) is a sales intelligence and engagement platform which allows you to **search and store new contacts to improve your B2B salesprocesses**. It also lets you **automate emails**, calls, and tasks to maximize efficiency and speed up your sales.
With Apollo, you can **search for new contacts** as you can **connect to LinkedIn to find verified email addresses and phone numbers**. You can also store them in your database and sync them directly with your CRM.
### **What is the starting situation for having to sync Apollo contacts with our database?**
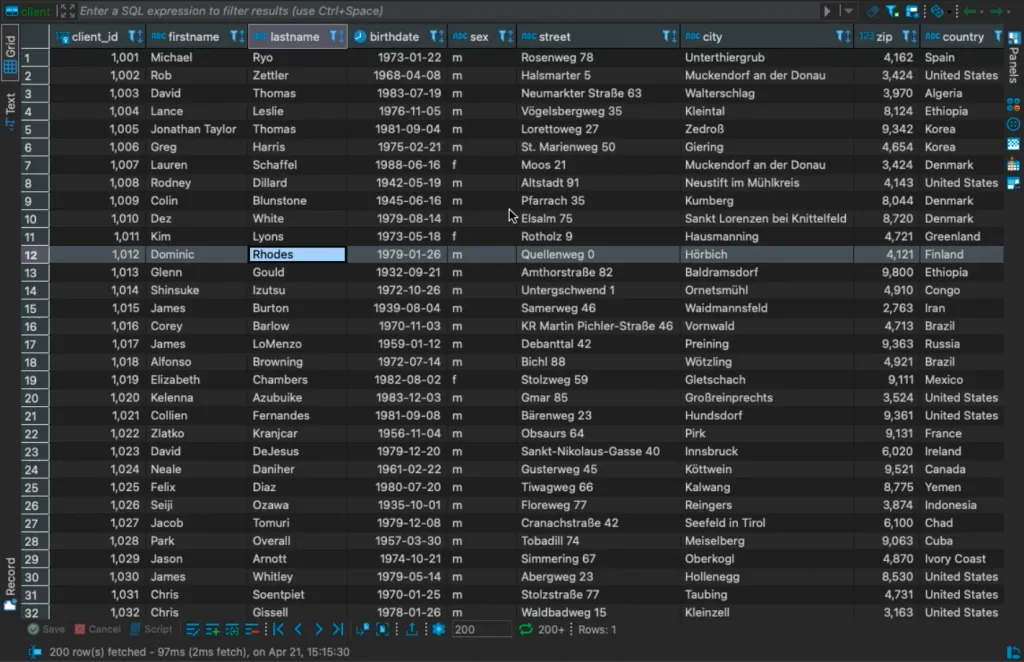
Our initial situation is this: We have an **e-commerce database** with the information of our clients.
We want to have that **information in our Apollo account, to set up some email automation sequences** to send those customers new product offers.
Also, in this process, we want to **deliver an email report with the contacts uploaded.**
So to show how to implement a full process in YepCode we are going to **build the process from scratch** by creating a brand new YepCode account.
### **Let’s go to the process.**
Once we’ve created a new account, you can see there are some sample processes you can interact with, but we’re going to **create a new one.**
This process will **query the database**, **upload the logs** using the Apollo.io API and **send the e-mai**l with the processed information.
So, we are going to start by giving the process a name and description.
Next, we need to **write the source code** for the process, **configure the input parameters** and we can also **write some documentation** for the process in a ‘markdown’ format.
The first step here is to **retrieve the client’s information from our database**. We are going to **build a flexible approach by requesting an SQL filter to build the query to retrieve our clients.**
> This integration would take hours to be implemented and would be very difficult to do with a nocode tool.- Marcos Muíño (YepCode founder)
We need to go to our [**parameters schema configuration**](/docs/processes/input-params). You can use some **snippets** to see the **JSON schema** that allows us to build the form but we already have the sample pre-build.
At this point, we are going to ask for the “SQL wherefilter”. With a default value which filters by country and limit.
Having this filter configured, in the source code we **need to access the YepCode parameters**. (As you can see, YepCode has some Snippets integrations).
Here we have our **MySQL client** and we need to provide **credential** information. In this case, we are going to play with a playground credential.
In our **documentation**, you can find all the necessary information to know how to build that **credential connection**.To configure the **MySQL credential**, we will go to the credentials section and create a new one. We’ll provide the name, our host, the user, also the password, the database and finally the port.
The next step will be to **retrieve the clients from the database**. As we have seen before, we already have the SQL filter, so our **source code** could be something like this.
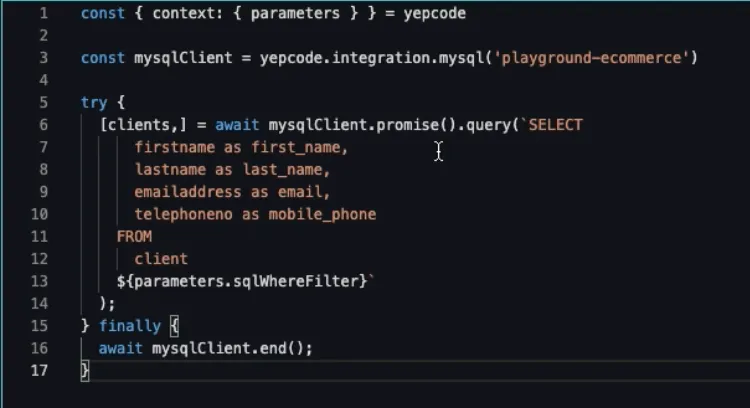
Now that we have the client, we will **build a query against our database client**. We will also **add the SQL filter** and then close the connection.
If we run this process, we will see the retrieved clients from our database.
### **Uploading the information to the Apollo account**
Our next step will be to **upload the information to the Apollo** account.
To achieve this, we are going to **add a new execution parameter** with the Apollo list where we want to store the new contacts.
So we add a new parameter that we will call ‘apolloContactsList’. And when we’re done, we’ll see **another input parameter with a default value.**
Now we need to **configure the credentialfor the Apollo.io API**, which will be an [**Axios**](/docs/integrations/axios) one. We provide the name, the base URL and some **HTTP headers**.
We can now use our credentials to **iterate over the retrieved clients in the MySQL database.**
For each client, we will display the first name & last name in the console log and then perform a **‘post’ request against the Apollo API**.
We need to provide the APOLLO.IO API KEY. The Apollo authentication can receive the API KEY as a query param.
### **Now, we’ll create a variable**
So we are going to use another YepCode feature, which is the [**Variables**](/docs/processes/team-variables).
We will create a new one with the name **APOLLO.IO API KEY**. Then we have to go to our Apollo account. In the integrations section, in the API, we will copy our key.
We will then **place it in the Apollo environment variable**.
We are using the **contacts method** as you can see in the documentation where you also find every single piece of information.
Once this is done, we can try another execution to check that everything is ok.
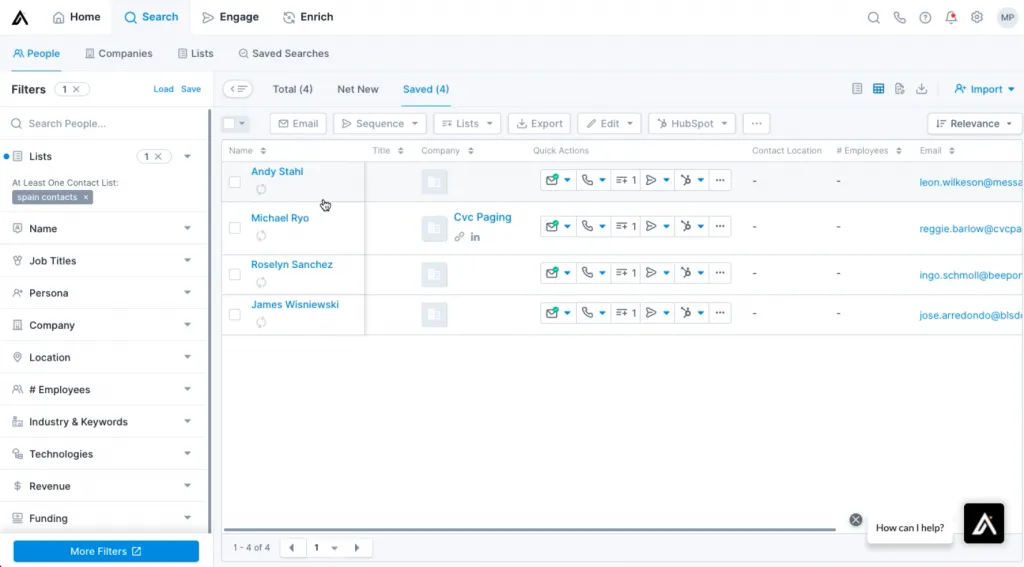
For example, we are going to filter by SPAIN and only ask for four records. We can verify that all four contacts have been uploaded.
If we now go to our Apollo account, we can see that **a new list has been created** and it has the four contacts that we have found in our database.
### **Setting up the e-mail report delivery**
To **send the e-mail report**, we need to **create a new credential** (in this case an **SMTP server**), and then write the code to deliver the e-mail with the desired content.
So we will start **configuring the Nodemailer credential** by introducing a server (in this case we’ll use **MailCatcher**) that will allow us to perform some tests against mail servers.
If we go now to our process we need to deliver the e-mail. We could use some snippets but we already have the source code here.
We will **set up the Nodemailer credential** and then we are going to build the e-mail that we want to deliver.
These **e-mail addresses** could also be configured in the input parameters, but for this case, **we already have them in the source code**.
We can try another execution, filtering, for example, by Japan and showing us seven contacts.
If we now go to our ‘MailCatcher’ we can see **the mail and the new contacts**. We can also see each contact with their address in Apollo.
This integration could be implemented for any business need, forgetting all the tasks related to the systems infrastructure.
### **Additional settings**
Once the whole process is done, we could configure a [**periodic execution**](/docs/executions/scheduled) but it would be necessary to make some changes in the source code to load only clients not previously loaded.
Another interesting approach would be to [**configure a webhook**](/docs/executions/webhooks) that allows this execution to be started from other systems.
### **Implementing the inverse process**
Implementing the **inverse process** would be quite straightforward. So we are going to **retrieve the Apollo contacts and then transfer them to our MySQL database**.
The **input parameter that we are going to use is a keyword**. We are going to ask the user for a keyword that would be used to search contacts in Apollo.
The source code for this process will be quite similar to the previous one.
We retrieve the YepCode parameters. **We will need the Apollo integration** but we don’t have to define it again cause we already have it from the previous process.
Now we **perform a search request**. (You could see in the Apollo API where this search method is available.)
We are going to use the **contacts search method** that allows us to provide some keywords that will be the ones from the parameters.
Having the Apollo contacts downloaded, we **start the MySQL credential** and we perform the insert in one existing database.
We will run now one execution, for example with YepCode with five contacts. We will create each row with the email and the name. **Then we will store the full JSON content** that Apollo provides us.
We can try another execution with 11 contacts and then we can find them in Apollo.
This is a sample of how to use [**the full power of YepCode**](/blog/an-overview-of-yepcode-technology-stack/) to solve your integration and automation needs.
Remember that our [**Docs platform**](/docs/) includes every single detail to make the most out of YepCode,
Enjoy the video and…
Happy coding! 🧑💻
# Employee onboarding flow automation to save time and avoid mistakes
> Thanks to a YepCode process you can automate your new employee onboarding flow saving time and avoiding human error.
When you hire new employees, it is not an easy task to have a **successful onboarding process**. There is a lot of paperwork to do and, depending on the company, it may be necessary to **register them in multiple systems** (email, ERP, PM System, database, etc).
In fact, if your company is not big enough to have its own human resources department. You will need to dedicate **valuable time from other team members to accomplish these tasks.**
Let’s look at an example of a technology company that was able to **succeed, save time and minimize human error** by automating this employee onboarding process.
### **Automating the employee onboarding flow of a tech-company**
[**Trileuco Solutions**](https://trileucosolutions.com/en) is the software development company behind YepCode.
They were born in 2010. Today they have a **team of developers** passionate about technology who have a wide range of skills in the most popular programming languages, including Java, C++, Python, PHP, and JavaScript.Among their services, they offer **mobile and web application development**, as well as custom development, design and **consulting**.
They focus on delivering high-quality products and developing **custom software solutions** to meet their customer’s business needs.
### **How can the automation of the employee onboarding flow help you?**
Currently, they have over 30 employees. Although their rotation ratio is not quite high, **each new employee onboarding is quite time-consuming,** creating accounts over several systems and services.
In the same way, every time they have an **offboarding**, they must remove that user account from many systems, making sure that person has no longer access to their systems.
Their legacy approach to solving this was to have the documentation properly updated in a Notion document. However, that was **causing their IT and HR teams to perform manual tasks** on whatever services users should have access to. This could also **cause some human error** which they should try to avoid.
With the irruption of YepCode, they decided that a great use case could be to **automate this onboarding flow.** To do so, they had to create a process that would accept the **new employee’s information** (name, email, services and roles), and **perform the necessary changes in each related service to create and configure that user account.**
In the same way, they could **automatethe offboarding flow.** Simply by requesting the user’s email, and **removing the necessary information from each system.**
### But is it always necessary to automate this onboarding process? Let’s go through our process.
Some of the systems involved in this case were **Keycloak** (which is their identity provider. But any other solution like **Ldap**, **Okta** or **Auth0** could be easily used with their integrations). They have a git repository (they use **BitBucket**, but other services like **GitHub** or **Gitlab** could be integrated). **Mattermost** (is their IM). They use **Redmine** as their project management tool. They have one internal app for **absences management.** And finally, they have all the **Kubernetes** cluster-related services (Prometheus, Kibana,…).
> Now we can streamline the onboarding process of our new employees, achieving a better landing experience at Trileuco. -*César Suárez (Head of People)*
So far, they have already integrated most of their services with their identity provider. So that, the signup in that service simplifies the user creation. However, with the others, it **is required a fine-grained configuration** that they have done with each **service API** or directly with changes in the needed databases.
After this process implementation, the HR team only has to **ask supervisors what roles each new employee should have.** Then\*\*,\*\* they can **configure it with the input parameters form** in the onboarding execution.
For the **offboarding process**, the only parameter required is the e-mail. After the execution, all the user accounts are **disabled in less than a minute**.
And this is how **YepCode can help companies** in their daily work by [**automating any task that may slow them down**](https://yepcode.io/using-yepcode/holded-documents-signature/).
Remember to visit our [**Docs platform**](/docs/) where you can find every single detail to make the most out of YepCode.
Happy coding! 🧑💻
# How to automate your Holded documents signature using an eSign provider
> In this case, we show you how you can use YepCode to automate your Holded documents signature and streamline your administrative paperwork.
In this case, we will proceed to **automate an estimate document signature** using Holded as a platform for generating, downloading and storing that document. This time we will use **Docuten** as an **electronic signature tool**, but we have also implemented this use case using **DocuSign**.
Holded is a [**cloud business management platform**](https://www.holded.com/) that allows you to carry out administrative procedures. With Holded you can have all your **data**, such as **documents**, **invoices**, and **customer information centrally** **controlled.** You can also associate this data with specific projects and share them among members of the same team.
This tool, also allows you to control the **management of your billing**, **accounting**, work teams, and **projects.** And it has **CRM features**.
Additionally, Holded **integrates with other third-party tools** thanks to its API. This makes its functionalities even more extensive and allows it to **automate processes** involving other complementary applications.
### **What is the workflow to automate Holded documents signature?**
Imagine this situation: One company sends another a quote for hiring their services.
The **workflow** begins when the sales department prepares and generates a **document of this quote in Holded**. From there, they send it to the client for review and acceptance.
When the **client accepts the quote**, the sales department has to notify the administration department to **download** the estimate document **from Holded.** Then, they **upload it to their eSign provider** (in this case we’ll use [**Docuten**](https://docuten.com/)). And from that tool, they send it to the client for **final signature**.
Once signed, the eSign provider sends a notice to the **administration department**. When this is done, they will have to **download the signed document** and send it to the sales department. In the final step, the sales department will have to upload it again to Holded to file it and **assign it to the corresponding project**.
This is a process that would take **considerable time.** It has **many** **bottlenecks** where delays can occur as it is very easy to miss the notices between sales and administration.
> With this process, we solve just in minutes what before would take us days.- Felipe Peña (Tracktherace CFO)
### **How do I proceed in YepCode to implement this process?**
In order to automate Holded documents signature in **YepCode,** **we have to define two processes.** One to **launch the signature** request and another to **handle the eSign provider callbacks** once the client has signed the quote.
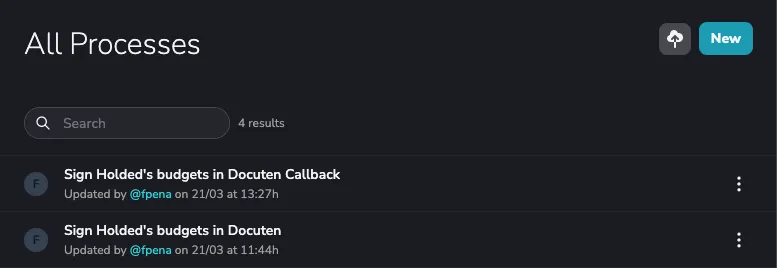
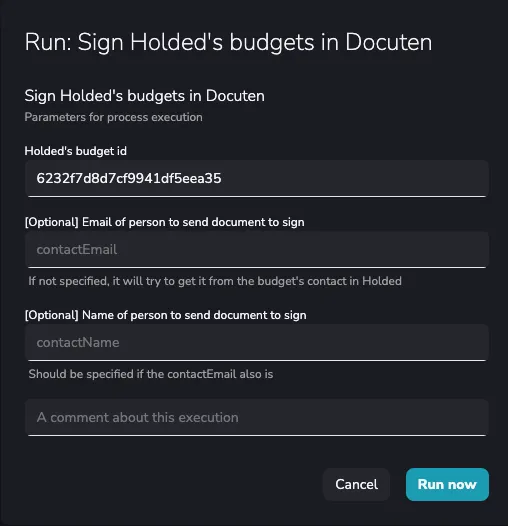
To launch a new signature request, we will simply execute the first process. We will **enter the quote Id in Holded as a parameter** and optionally we will **indicate the email and name of the person responsible** for signing (in another case, the data of the person responsible for the client associated with the quote in Holded).
We will launch the second process [**thanks to the** “**webhooks**” **functionality**](/docs/executions/webhooks) provided by YepCode and **the Docuten service will automatically invoke it** when the client has signed the quote.
In order to implement the processes, we have defined three “**credentials**”. For two of them, we will use the **integration with Axios** for access to the **Docuten and Holded APIs** (where we configure our access token to them). In the third, we will use the **integration with Nodemailer** (with our access data to **SendGrid** that we will use to send notifications by email from the processes).
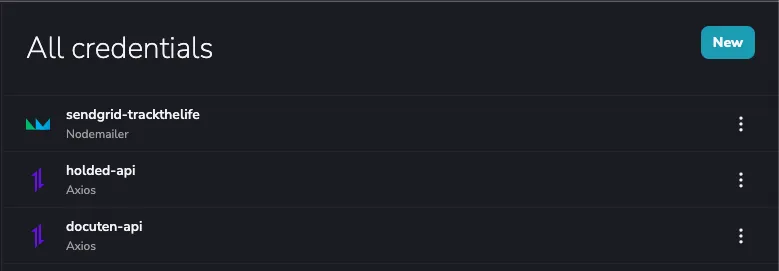
Some code usage examples of these integrations:


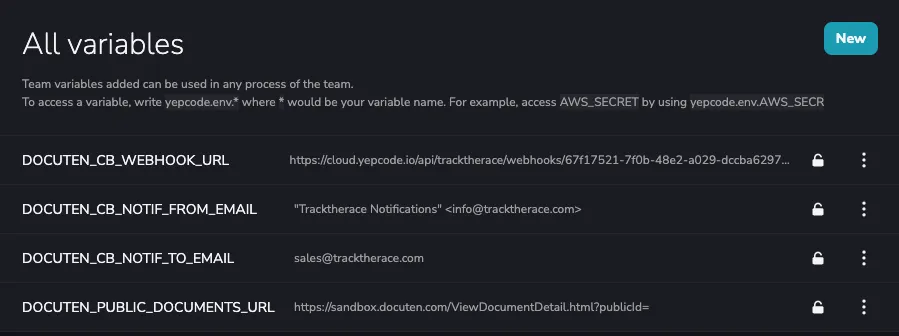
Finally, we will also make use of the **variables function** to **parameterize the processes.** By doing this, they can be **imported and other clients could use them** according to their own needs.
And that’s all. We have reduced a considerable amount of time by creating this process (around 75% of the time), since with a few clicks we can solve the electronic signature of an estimate.
This demonstrates YepCode’s ability to [**connect with other platforms and create automations**](https://yepcode.io/using-yepcode/docuten-extended-saas-features-using-yepcode/) to speed up day-to-day tasks.
Remember to visit our [**Docs platform**](/docs/) where you can find every single detail to make the most out of YepCode,
Happy coding! 🧑💻
# NodeJS streams to solve a data movement problem, minimizing memory and increasing speed
> We solved a data movement problem while minimizing memory consumption and with high-speed transfer data rates thanks to a NodeJS Stream system and FTP and SQL server integrations.
As you may know, YepCode uses **JavaScript** as programming language, and **NodeJS** is the current execution engine.We are working to support other languages like **Python** or **Go!** in the future.
NodeJS is an open-source, cross-platform, single-threaded **runtime environment** for building **fast and scalable** server-side and network **applications**.
It uses a non-blocking, event-driven I/O architecture, making it efficient and **suitable for real-time applications**.
One of the advantages of using NodeJS is that it allows you to **handle a large number of simultaneous connections with high performance**. It is fast, efficient and widely used for **Chatbots**, **Streaming** applications (Netflix uses it!) and **IOT**.
As seen before, moving information between applications can be an extremely tedious task, especially if [**we are dealing with large volumes of data**](https://yepcode.io/using-yepcode/how-to-automate-efficiently-data-movements-from-google-bigquery-to-snowflake/).
Today we bring you an example demonstrating how YepCode can solve a data movement problem while **minimizing memory consumption** and **with great transfer data rates.**
### What can I use a NodeJS Stream for?
A Stream is a flow of information that programmers usually use to **transfer data**. ‘Streams’ were built to **handle data in real-time** through a buffer.
Their main advantage is that **you do not need to store the entire data in memory** at the same time, but parts of this data. So it can also process file streams that can be read in parts without their full context.
Streams are very useful when we need to **query information** that comes **from multiple data sources**.
This sample shows one need that one of our clients had, as they needed to [**download a CSV file**](/docs/libraries/request), [**process each CSV line**](/docs/libraries/csv), convert each entry to a JSON format upload it to an [**FTP server**](/docs/integrations/sftp) and also insert each row in a [**Microsoft SQL Server**](/docs/integrations/mssql) database. This use case could be a full project created from scratch, but with YepCode, and some dozens of lines of code, it’s done!
The YepCode **integrations used have streams support**, so we are able to create a stream from the file URL, **pipe** the content to a transformer that **converts each entry to a JSON**, and in parallel, **pipe that JSON to the FTP and SQL Server integrations**. All the process is extremely **fast** and with no memory consumption!
### Watch how to execute this Stream process in the next video
If you watch the video below, you will see an example of the execution of this process.
As you may see, we copy the **URL** and when we hit the execution, **italready asks us for the URLof the file** that we include. We run it and this is already processing all the data.
As we have said before, the process does not load all data in memory.
You can also observe that the **process has finished successfully**, **processing** the entire **89 rows**.
If you now go to the **FTP server** we will see that **the generated JSON data is here**.
Here you can also see that the process has converted the **.CSV to a JSON** format.
And finally, if you go to the **SQL Server Database**, you will see that we have 89 records.
Remember that our [**Docs platform**](/docs/) includes every single detail to make the most out of YepCode,
Enjoy the video and…
Happy coding! 🧑💻
# How Tracktherace used YepCode to retrieve GPS SPOT data and push it to their platform
> YepCode was able to retrieve GPS data and display it on the Tracktherace platform in a location with difficult coverage due to challenging orography.
### First of all, what is Tracktherace?
Tracktherace is one of the big players on [**GPS tracking for sports events**](https://tracktherace.com/). It offers a comprehensive service that helps to **level up sporting events** by providing benefits in four different areas: security, tracking, management and promotion.
Its basic operation is simple, although there is a lot of work and complexity in its internal development.
The platform **combines the power of GPS tracking devices with real-time tracking software** that displays the position of these devices on a **map view**.
This allows, in addition to **seeing the position of each participant in real-time within a race**, to process that position data to generate advanced statistics such as classifications, waypoints, provisioning, stoppages, etc.
The devices also have an SOS button, which will display a highly visible, flashing prompt on the map view once pressed. This allows organizers to **act quickly in case of an emergency**.
Tracktherace can be adapted to multiple sports disciplines. However, it is **especially useful in long-distance endurance races** such as trails, ultra-trails, adventure races, mtb ultramarathons, etc. In this type of sporting event, both the duration and the orography of the terrain make it very difficult to know what is happening. Tracktherace also allows the **event to be brought closer to the public** since, due to the conditions, it would be very difficult for them to be present on site.
### How Tracktherace really works?
The company has a stock of more than **1000 GPS trackers** that **receives positioning** **information from GPS satellites and forward that information to a cloud server using TCP connections**. That server implementes the devices protocol, and process the received information saving the positioning information in their database to be used later in the race map view, the classification and dashboards calculations,…
This kind of device **uses the GPRS network protocol** to deliver the information to the Tracktherace servers. But there is an issue here, if there is no phone coverage, the system can’t work in real-time.
Luckily, there are **other** kinds of **GPS** trackers that don’t need phone coverage to work, as **they deliver positioning information using satellites**. Two of the most know devices are **SPOT** and **InReach,** and each one has it’s own data protocol.
### Panamá Adventure Race, a great orographic challenge
One of the last races in which Tracktherace was hired to be used was [**AR Panamá 2022**](https://arpanama.com/en/homepage-english/). Panamá is one o the best destinations for an adventure race. It has all the ingredients that any adventurer looks for: Volcanoes, jungle, mangroves, mountains, beaches… Unfortunately, this breathtaking landscape came with a price with respect to the race organization.
In this race area, **the phone network coverage was poor**, so the organization opted to ask for the use of Satellite devices.
It was needed that Tracktherace implemented that devices protocol on their server-side. But instead of that, **a more agile solution was done**.
They used a **YepCode process** **to fetch the information from SPOT servers** (it provides an XML as positioning information). Then they convert that information into the same protocol that Tracktherace had already implemented, and then **forward that information to Tracktherace servers**.
In this integration, they only needed to **use the** [**Axios integration**](/docs/integrations/axios) **and XML libraries**. Afterward, a [**scheduled run setup**](/docs/executions/scheduled) was enough to come full circle.
Tracktherace joins to other Saas companies like [**Docuten**](https://yepcode.io/using-yepcode/docuten-extended-saas-features-using-yepcode/), that are **validating new features** in a simple approach As a result, they will be able to improve their core business with minimal effort.
Happy coding! 🧑💻
# Using YepCode to collect and visualize strategic data from your e-commerce
> This is an example showing how YepCode may be used to retrieve information from a MySQL database and expose that info in a HTTP endpoint with JSON format.
As seen before, [**YepCode can be used for tedious ETL tasks**](https://yepcode.io/using-yepcode/how-to-automate-efficiently-data-movements-from-google-bigquery-to-snowflake/) that can be time-consuming to perform. Just simply using its automation potential.
From the point of view that we can offer as its creators, we believe that the potential of Yepcode is enormous. And **capable of dealing with very complex processes that involve the treatment of large volumes of data,** in a very efficient way.
Today, we are happy to tell you **how to retrieve, filter and extract your most important e-commerce data.** This can help you improve your business and save time configuring servers, tools or scripts.
### So, let’s code!
This example shows how we can use [**#YepCode**](https://twitter.com/hashtag/YepCode?src=hashtag_click) to retrieve information from a **MySQL** database of an online store built with **Woocommerce** and expose that information to a **JSON-formatted HTTP endpoint.**
The first step to get the most out of your e-commerce data is to create a credential that stores the information to access the MySQL **database by giving access to them from YepCode cloud.**
We’ll use the [**YepCode tunneling system**](/docs/network-access), which allows using SSH tunnels to connect to services behind a firewall.
Next, we’ll create a new process accepting the product name filter as a parameter.
We’ll use promises to ensure that the result is returned after every needed work has been done.
Then we’ll add the process source **code** to:
* Open the database **connection**
* Run the **query** with the filter as param
* Close **connection**
* And return the **results**
As we want to expose that information in an HTTP **endpoint,** we’ll create a new **Webhook** **Trigger** that will generate a **cURL** sample to run the Webhook from a terminal.
We’ll run a synchronous execution to retrieve and show the final result.
Remember that our [**Docs platform**](/docs/) includes every single detail to make the most out of YepCode,
You can watch this process in the next video!
Happy coding!
# How to efficiently automate bulk data movement from Google BigQuery to Snowflake
> We show you how YepCode can be used to automate the movement of large amounts of data from BigQuery to Snowflake in an incremental approach.
Following the topic line of articles in which we explained in detail some practical examples of [**how to carry out different processes, automation and integrations with YepCode**](https://yepcode.io/blog/), today we are going to talk about how to automate the transfer of large volumes of data from **Google BigQuery to Snowflake** in the most efficient way.
### Moving large amounts of data from Google BigQuery to Snowflake is not an agile duty
There are lots of **NoCode ETL tools** in the market that **allow moving information between several data sources** (both on-premise services or SaaS). But it’s a common problem that users can’t fully adapt those loading processes to all their needs.
Think, for example, in a scenario where information is generated every day in [**Google BigQuery**](/docs/integrations/google-bigquery) (ie: Google Analytics events information). Imagine that you want to **copy that information into a** [**Snowflake**](/docs/integrations/snowflake/) **database in a nightly process**.
A mandatory requirement should be to copy only new events that have not been previously copied. Before going to BigQuery, you need to go to **Snowflake to retrieve the last loaded date**. This way you can use it later **to build the BigQuery SQL sentence**. Typically, this may be to **check the max value of a date** column or use a control table that **tracks every load execution**.
You may also need to be notified (with an [**email**](/docs/integrations/nodemailer/) or a [**Slack**](/docs/integrations/slack-bolt/) notification) about **how that load was performed** (ie: reporting the number of new events loaded).
One last requirement could be take to into account that **millions of events are generated every day**. In that case, a *simple* approach of \*\*running an SQL against BigQuery and for each row performing an insert in Snowflake may not work.\*\*
```js
// This is a bad approach to load millions of rows
const [job] = await bigqueryClient.createQueryJob({
query: `SELECT column1, column2 FROM table1`
});
const [rows] = await job.getQueryResults();
snowflakeClient.execute({
sqlText: 'insert into table1(column1, column2) values(?, ?, ?)',
binds: rows.map((row)=> [row.column1, row.column2]])
});
```
### We leverage Yepcode integrations to create the most effective workflow for this process
Under this situation, the flow we would propose using YepCode integrations would include these steps:
* Run a **synchronous SQL** **select against Snowflake** to get the last loaded date and also the current amount of events. We could **use a reusable function for this syncExec approach** and **include it in one** [**YepCode JS Module**](/docs/processes/js-modules):
```js
exports.snowflakeSyncExec = (snowflakeClient, sqlText, binds = [], rest = {}) => {
return new Promise((resolve, reject) => {
snowflakeClient.execute({
sqlText,
binds,
...rest,
complete: (err, stmt, rows) => {
if (err) {
reject(err);
return;
}
resolve([stmt, rows]);
},
});
});
}
```
* With that **reusable function**, the last loaded **date** and current amount of **rows** could be **retrieved** with something like:
```js
const [, rows] = await snowflakeSyncExec(snowflakeClient, "SELECT MAX(DATE) AS LAST_LOADED_DATE, COUNT(1) AS ROWS_AMOUNT FROM table1");
const LAST_LOADED_DATE = rows[0].LAST_LOADED_DATE
const ROWS_AMOUNT = rows[0].ROWS_AMOUNT
```
* Using the previously retrieved date, we could **create a Google BigQuery SQL sentence** to get the new events and **execute** that query **in BigQuery**.
* Instead of returning the rows, we’ll **leave them in a** [**Google Cloud Bucket**](/docs/integrations/google-storage/) **with CSV format**.
* To achieve this, we must **use the export data feature**, which may **leave the rows returned by the query in a CSV** file within Google Cloud Bucket [(](https://cloud.google.com/bigquery/docs/exporting-data)[related docs)](https://cloud.google.com/bigquery/docs/exporting-data).
* A piece of sample code could be:
```js
const exportQuery =
`EXPORT DATA OPTIONS(
uri='gs://my-google-cloud-bucket-name/my-table-export-file_*',
format='CSV',
header=true,
compression='GZIP',
field_delimiter=',') AS
SELECT column1, column2 FROM table1 WHERE date > @last_loaded_date
`;
googleBigQueryClient.createQueryJob({
query: exportQuery,
params: {last_loaded_date: LAST_LOADED_DATE}
});
```
* Note that this **data export** approach may be **also used with GZIP compression** to reduce network use.
* Having the query result exported in a file in the bucket, we can directly **load that CSV file into Snowflake** **using** a preconfigured stage. This is a **lovely feature** in Snowflake ([related docs](https://docs.snowflake.com/en/user-guide/data-load-gcs-copy.html)).
* The piece of code could be:
```js
const importCSVSqlSentence =
`COPY INTO my_table_name
FROM @stage_for_google_cloud_bucket
PATTERN='my-table-export-file_.*';`;
snowflakeSyncExec(snowflakeClient, importCSVSqlSentence);
```
* Having the new information loaded in Snowflake, we could **remove the previously generaded CSV files**. The [**Google Cloud Storage**](/docs/integrations/google-storage/) integration may help us:
```js
googleCloudStorageClient.bucket('my-google-cloud-bucket-name').deleteFiles({
prefix: 'my-table-export-file_'
});
```
* As last step we could **run another query in Snowflake** to get the new number of events loaded and with that information, we could **build a notification message** and deliver it via email or with the slack integration [(related docs)](https://slack.dev/bolt-js/concepts#message-sending).
* The piece of code to send that message could be:
```js
await slackBotClient.chat.postMessage({
channel: "bigQuery-snowflake-load",
text: `Load successfully finished with ${rowsAmount} new rows copied!`,
});
```
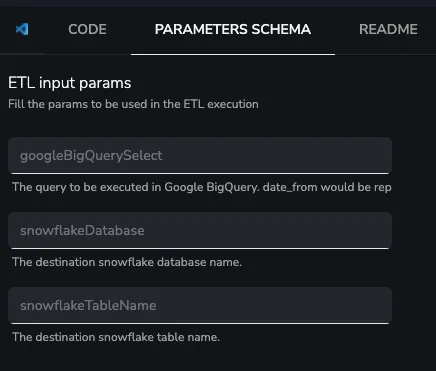
To implement the full process in YepCode, you’ll need to **configure a Google service account** with access to the **Google BigQuery** and **Google Cloud Bucket**. Also, follow the guide in Snowflake to configure a stage that may be able to read information from that Bucket.Having that configuration created, the best option could be to **create a generic process** that could **carry out the movement of information** in a parameterized way, receiving these parameters:
* SQL sentence to execute in Google BigQuery (having the start load date as a parameter)
* SQL sentence to execute in Snowflake to retrieve the last loaded date and the number of events
* Snowflake destination database and table name
# Using YepCode to publish a Snowflake query result into Airtable
> We move information between Snowflake and Airtable by creating a process that executes an SQL query in Snowflake and streams the results to Airtable.
[**Airtable**](https://www.airtable.com/) and [**Snowflake**](https://www.snowflake.com/) are two of the big players in the modern \*\*databases ecosystem.\*\*
Their approach is quite different. **Snowflake** focus on **data warehouse** features **allowing the management of enormous amounts of information** in a faster and more flexible way than traditional databases. **Airtable**, on the other hand, is more similar to Excel on steroids, **allowing to build powerful applications with a NoCode approach**.
### How can I move data from Snowflake to Airtable with YepCode?
In this post we’ll show how **YepCode** may be **used to move information between these two SaaS**, creatinga generic process that receives the following input **parameters**:
* The Snowflake query to be executed
* The Airtable base & view names
* The (optional) mapping between Snowflake and Airtable column names
* A flag to decide if use streams instead of loading all query results in memory (more suitable for a great number of rows)
The process will start by **opening the connection** to Snowflake.
Then it will **run the query in an asynchronous way** (using JS promises).
When the query **returns all the rows** (or for each row in the streamed approach), **it will create new entries in Airtable** using the correct column mapping.
### **Ok, but too much text, show me code!**
In this case, **we are not doing a *copy\&paste*** of the full process code (as we have done in one previous post for [**Cryptocurrency dollar-cost averaging sample**](/blog/cryptocurrency-dollar-cost-averaging-using-yepcode/). Here, we only reference a public view of the process.
From that public page, you couldn’t run the sample, but you only have to [**create your own YepCode account**](https://yepcode.io/get-started/) and create the needed [**Airtable**](/docs/integrations/airtable) **and** [**Snowflake**](/docs/integrations/snowflake) credentials to start to use it!
Happy coding 🧑💻[](https://cloud.yepcode.io/public/sandbox/processes/sample-snowflake-query-to-airtable-base)
[Click here to view the process in full detail](https://cloud.yepcode.io/public/sandbox/processes/sample-snowflake-query-to-airtable-base)
# How Docuten has extended their Saas features using YepCode
> Docuten offers its clients invoices in various electronic formats not included in its core. The YepCode process connects to the Docuten FTP server using our SFTP integration.
[**Docuten**](https://docuten.com) is a leader in **administrative processes digitalization**, transforming clients into “paperless companies”.
They achieve that by digitally converting any administrative processes through **digital signature, electronic invoicing and payments**. By relying on **Docuten** as their sole provider, companies can **reduce costs** by 50%. In addition, they can perform this deployment 2.5 times faster than working with several different providers.
**Docuten has recently started to use YepCode**. Their main goal is to validate some new functionalities before including them in their core **Saas product**.
Here is a good example of how they are doing this. There is a **YepCode process** that allows Docuten to offer their clients to **receive invoices in several electronic invoice formats that are not yet in their core product**.
Their platform works mainly with factura-e invoice format. And they may place the generated invoices in an **FTP server.**
The created YepCode process **opens a connection to that FTP server,** looking for some newly generated invoices. This connection is possible thanks to the use of our [**SFTP integration**](/docs/integrations/sftp). If any new invoices appear on the server, they are converted to another invoice format using an [**XML parser**](/docs/libraries/fast-xml-parser). After that, the **new documents are uploaded again to the FTP server**.
With this simple process, Docuten is able to offer **several electronic invoice formats to their clients.** These formats may be extended by publishing [**new versions of the YepCode process.**](/docs/processes/process-versioning) Additionally, this process hasn’t modified their core product at all.
In conclusion, we believe that using **YepCode** with this strategy can **help many Saas companies to validate new features.** As a result, they will be able to improve their core business **with minimal effort.**
[**Book a demo**](https://yepcode.io/book-a-demo/) if you think that YepCode may help you and we’ll be happy to guide you to get the most out of it.
# Cryptocurrency dollar cost averaging using YepCode
> YepCode could help you to do cryptocurrency dollar cost averaging (DCA) investment with using the Kraken, Binance and Coinbase exchanges.
## The word cryptocurrency is no longer just a fad.
For many, the **cryptocurrency universe** is just a hobby, but for many others a way to invest their money.
In this article, we are going to show you how [YepCode could help you](/blog/why-was-yepcode-created/) to do **dollar-cost averaging (DCA)** investments with cryptocurrencies using the **Kraken exchange**.
Dollar-cost averaging is an **investment strategy** that aims to **reduce the impact of volatility on large purchases of financial assets**. And, for sure, those cryptocurrencies are volatile 💸.
The idea behind DCA is to **spread purchases across predefined intervals, regardless of asset prices**.
You can find lots of information about this strategy ([Wikipedia](https://en.wikipedia.org/wiki/Dollar_cost_averaging), [CoinMarketCap article](https://coinmarketcap.com/alexandria/article/what-is-dollar-cost-averaging)…), or use some tool like [dcaBTC](https://dcabtc.com/) to calculate how this strategy could work with [Bitcoin](https://en.wikipedia.org/wiki/Bitcoin) in the past.
## Strategy is the key to improving your activity with cryptocurrencies
Think that **you want to invest in Bitcoin** and your budget is $500. You could make an **order at today’s price**. But maybe **you don’t want to invest the whole budget taking the risk that tomorrow the price is lower.** An alternative could be to invest that budget in a fixed period of 5 months, investing $100 a month or $25 a week or $3,33 a day.
If you want **to do this with manual orders in your cryptocurrency exchange, it may be a hard task**. The biggest problem may be that you forgot to do the orders. Or your sentiment about the price at that moment could make that you don’t really create the orders, going against the strategy.
A much better approach would be to **automate that order creation tasks, and YepCode is a perfect tool to do that.**
This blog post shows how to create a flexible YepCode process that allows you to do DCA for customers of the popular crypto exchange [Kraken](https://www.kraken.com/), using its [Rest API](https://docs.kraken.com/rest/).
The process accepts the following **parameters** for each execution:
* Cash currency symbols to be used: **EUR**, **USD**, **GBP**, **JPY**,… (the process doesn’t make deposits from banks, so the customer must have enough balance for the order in its **Kraken** account)
* **Cryptocurrency** **symbols** to buy: **BTC**, **ETH**, **ADA**,…
* Amount of cash to buy at the current **crypto price**
* An array of other possible orders at a reduced price (percentage/amount).
If your purpose is to learn **how a process can be created in YepCode from scratch**, keep reading as we are showing the steps and linking to the related page in [our docs](/docs/).
## So let’s stop talking and go for it.
The first step is to create a [new process](/docs/processes/):
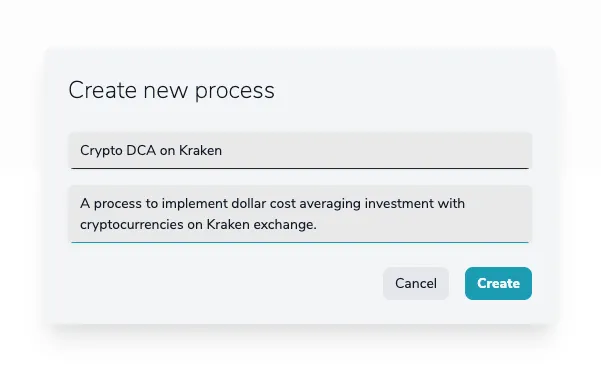
YepCode supports a [README](/docs/processes/the-readme) for each process. For our case, it could be interesting to add some guides about what changes we need in Kraken to allow the process to access your cryptocurrency account.
The README content is a [markdown](https://en.wikipedia.org/wiki/Markdown), and a proposal content could be:
```js
# Crypto DCA on Kraken
This is a YepCode process to implement [dollar cost averaging (DCA)](https://en.wikipedia.org/wiki/Dollar_cost_averaging) investment with cryptocurrencies on [Kraken](https://www.kraken.com/) exchange using its [REST API](https://docs.kraken.com/rest/).
In orther to use this YepCode process, you have to be customer of Kraken, and you have to create one pair of API keys.
## Kraken API keys creation
You can do this with the following steps:
* Login to your Kraken account.
* Visit *Security / API* under user menu.
* Press *Add key* and set the following permissions:
* Funds:
* Query Funds
* Order & Trades:
* Query Open Orders & Trades
* Query Closed Orders & Trades
* Create & Modify Orders
* Cancel/Close Orders
* Press *Generate Key* and backup your new API keys
More info in [Kraken help](https://support.kraken.com/hc/en-us/articles/360000919966-How-to-generate-an-API-key-pair-)
```
Following this guide, and after having these two keys, we have to create two [YepCode environment variables](/docs/processes/team-variables/) to store their values. The name of the variables should be **KRAKEN\_API\_KEY** and **KRAKEN\_API\_SECRET**.
It’s time to configure the [input params](/docs/processes/input-params/) for the process, allowing the user to provide the cash and cryptocurrencies, to use. And also the amount of cash to spend.
The JSON to configure our input parameterss would be this one:
```js
{
"type": "object",
"title": "DCA orders configuration",
"properties": {
"cashCurrencyCode": {
"title": "The cash currency code with available amount on Kraken account",
"description": "Valid values: USD, EUR, CAD, JPY, GBP, CHF, AUD",
"type": "string"
},
"cryptoCurrencyCode": {
"title": "The crypto currency to buy",
"description": "Valid values: BTC, ETH, ADA, BNB, SOL, DOT,...",
"type": "string"
},
"closeOpenOrdersForThisCrypto": {
"title": "Close open orders for this currency pair?",
"type": "boolean"
},
"marketOrderQuantity": {
"title": "Amount of cashCurrencyCode to invest at current price",
"description": "If some quantity is set, a market price order will be created",
"type": "number",
"default": 0
},
"ordersBelowCurrentPrice": {
"title": "Other orders for lower price",
"description": "Process allow to create orders for a reduced market price (in percentage)",
"type": "array",
"items": {
"type": "object",
"properties": {
"pricePercentage": {
"title": "The percentage (0.01-0.99) of the current price to place this order",
"description": "If you set 0.85, and current price is 300, the order would be created for 255",
"type": "number",
"default": 0,
"min": 0.01,
"max": 0.99
},
"quantity": {
"title": "Amount of cashCurrencyCode to invest at this percentage",
"type": "number",
"default": 0
}
}
}
}
},
"required": [
"cashCurrencyCode",
"cryptoCurrencyCode"
]
}
```
As a result, **YepCode could build a form** to be shown to the user on each new execution configuration:
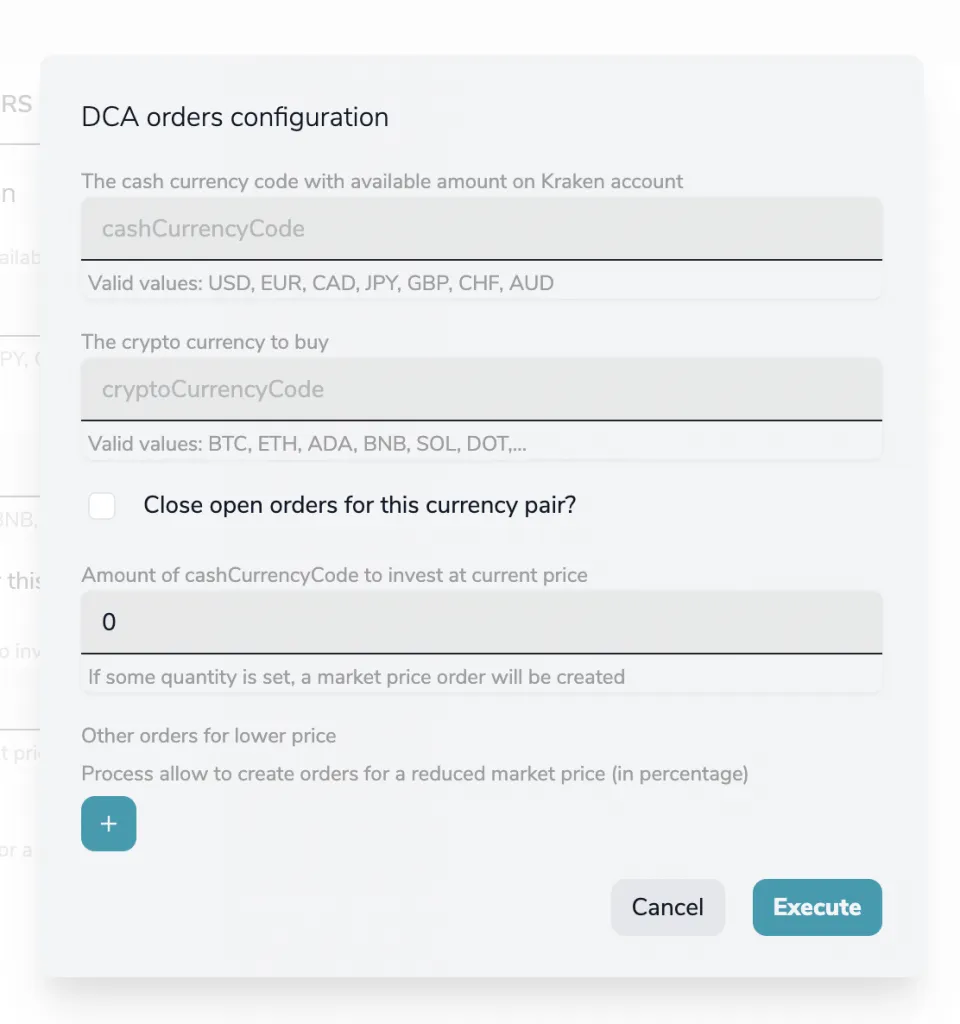
We’ll need all the code to **interact with Kraken API**. We could add all the implementation in this same process. But as it seems a quite reusable component, a better idea is to use the [YepCode JS modules](/docs/processes/js-modules/) feature to create a new module with a Kraken API client implementation.
Let’s create a new Library:
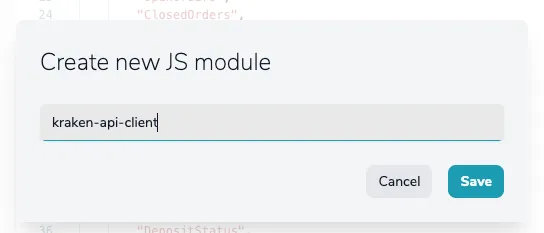
And **fill the source code for the module**, ensuring that we export the desired objects or functions:
```js
// JS module copied, with some minor changes, from:
// https://github.com/nothingisdead/npm-kraken-api/blob/master/kraken.js
const { post } = require("axios");
const { createHash, createHmac } = require("crypto");
const { stringify } = require("query-string");
// Public/Private method names
const methods = {
public: [
"Time",
"Assets",
"AssetPairs",
"Ticker",
"Depth",
"Trades",
"Spread",
"OHLC",
],
private: [
"Balance",
"TradeBalance",
"OpenOrders",
"ClosedOrders",
"QueryOrders",
"TradesHistory",
"QueryTrades",
"OpenPositions",
"Ledgers",
"QueryLedgers",
"TradeVolume",
"AddOrder",
"CancelOrder",
"DepositMethods",
"DepositAddresses",
"DepositStatus",
"WithdrawInfo",
"Withdraw",
"WithdrawStatus",
"WithdrawCancel",
"GetWebSocketsToken",
],
};
// Default options
const defaults = {
url: "https://api.kraken.com",
version: 0,
timeout: 5000,
};
// Create a signature for a request
const getMessageSignature = (path, request, secret, nonce) => {
const message = stringify(request);
const secret_buffer = new Buffer.from(secret, "base64");
const hash = new createHash("sha256");
const hmac = new createHmac("sha512", secret_buffer);
const hash_digest = hash.update(nonce + message).digest("binary");
const hmac_digest = hmac
.update(path + hash_digest, "binary")
.digest("base64");
return hmac_digest;
};
// Send an API request
const rawRequest = async (url, headers, data, timeout) => {
// Set custom User-Agent string
headers["User-Agent"] = "Kraken Javascript API Client";
const options = { headers, timeout };
const { data: response } = await post(
url,
stringify(data),
options
);
if (response.error && response.error.length) {
const error = response.error
.filter((e) => e.startsWith("E"))
.map((e) => e.substr(1));
if (!error.length) {
throw new Error("Kraken API returned an unknown error");
}
throw new Error(error.join(", "));
}
return response;
};
/**
* KrakenClient connects to the Kraken.com API
* @param {String} key API Key
* @param {String} secret API Secret
* @param {String|Object} [options={}] Additional options. If a string is passed, will default to just setting `options.otp`.
* @param {String} [options.otp] Two-factor password (optional) (also, doesn't work)
* @param {Number} [options.timeout] Maximum timeout (in milliseconds) for all API-calls (passed to `request`)
*/
class KrakenClient {
constructor(key, secret, options) {
// Allow passing the OTP as the third argument for backwards compatibility
if (typeof options === "string") {
options = { otp: options };
}
this.config = Object.assign({ key, secret }, defaults, options);
}
/**
* This method makes a public or private API request.
* @param {String} method The API method (public or private)
* @param {Object} params Arguments to pass to the api call
* @param {Function} callback A callback function to be executed when the request is complete
* @return {Object} The request object
*/
api(method, params, callback) {
// Default params to empty object
if (typeof params === "function") {
callback = params;
params = {};
}
if (methods.public.includes(method)) {
return this.publicMethod(method, params, callback);
} else if (methods.private.includes(method)) {
return this.privateMethod(method, params, callback);
} else {
throw new Error(method + " is not a valid API method.");
}
}
/**
* This method makes a public API request.
* @param {String} method The API method (public or private)
* @param {Object} params Arguments to pass to the api call
* @param {Function} callback A callback function to be executed when the request is complete
* @return {Object} The request object
*/
publicMethod(method, params, callback) {
params = params || {};
// Default params to empty object
if (typeof params === "function") {
callback = params;
params = {};
}
const path = "/" + this.config.version + "/public/" + method;
const url = this.config.url + path;
const response = rawRequest(url, {}, params, this.config.timeout);
if (typeof callback === "function") {
response
.then((result) => callback(null, result))
.catch((error) => callback(error, null));
}
return response;
}
/**
* This method makes a private API request.
* @param {String} method The API method (public or private)
* @param {Object} params Arguments to pass to the api call
* @param {Function} callback A callback function to be executed when the request is complete
* @return {Object} The request object
*/
privateMethod(method, params, callback) {
params = params || {};
// Default params to empty object
if (typeof params === "function") {
callback = params;
params = {};
}
const path = "/" + this.config.version + "/private/" + method;
const url = this.config.url + path;
if (!params.nonce) {
params.nonce = new Date() * 1000; // spoof microsecond
}
if (this.config.otp !== undefined) {
params.otp = this.config.otp;
}
const signature = getMessageSignature(
path,
params,
this.config.secret,
params.nonce
);
const headers = {
"API-Key": this.config.key,
"API-Sign": signature,
};
const response = rawRequest(url, headers, params, this.config.timeout);
if (typeof callback === "function") {
response
.then((result) => callback(null, result))
.catch((error) => callback(error, null));
}
return response;
}
}
module.exports = KrakenClient;
```
**We like to follow the clean code conventions**. Another interesting module to be created could be one to use **Kraken API** common functions:
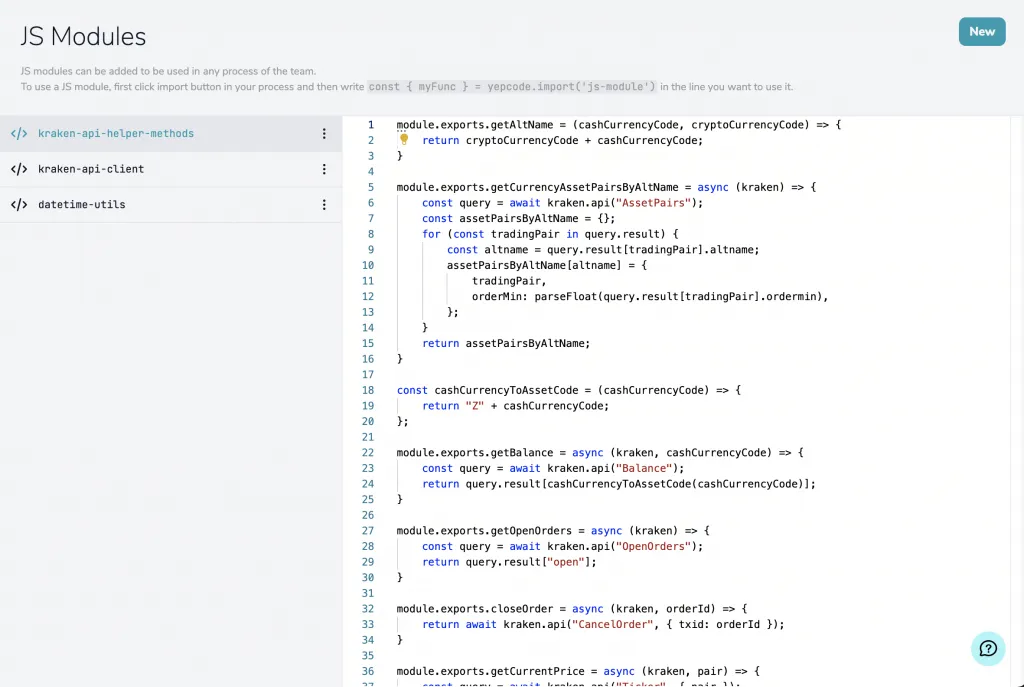
The full source code of this library would be:
```js
module.exports.getAltName = (cashCurrencyCode, cryptoCurrencyCode) => {
return (cryptoCurrencyCode == 'BTC' ? 'XBT' : cryptoCurrencyCode) + cashCurrencyCode;
}
module.exports.getCurrencyAssetPairsByAltName = async (kraken) => {
const query = await kraken.api("AssetPairs");
const assetPairsByAltName = {};
for (const tradingPair in query.result) {
const altname = query.result[tradingPair].altname;
assetPairsByAltName[altname] = {
tradingPair,
orderMin: parseFloat(query.result[tradingPair].ordermin),
};
}
return assetPairsByAltName;
}
const cashCurrencyToAssetCode = (cashCurrencyCode) => {
return "Z" + cashCurrencyCode;
};
module.exports.getBalance = async (kraken, cashCurrencyCode) => {
const query = await kraken.api("Balance");
return query.result[cashCurrencyToAssetCode(cashCurrencyCode)];
}
module.exports.getOpenOrders = async (kraken) => {
const query = await kraken.api("OpenOrders");
return query.result["open"];
}
module.exports.closeOrder = async (kraken, orderId) => {
return kraken.api("CancelOrder", { txid: orderId });
}
module.exports.getCurrentPrice = async (kraken, pair) => {
const query = await kraken.api("Ticker", { pair });
return query.result[pair]["b"][0];
}
module.exports.addOrder = async (kraken, pair, price, volume) => {
const newOrderParams = {
pair,
type: "buy",
ordertype: "limit",
price,
volume,
};
//console.log(`New order params: ${JSON.stringify(newOrderParams)}`);
return kraken.api("AddOrder", newOrderParams);
}
```
**The process sends a report using an email client**. In this case, we are using the [Nodemailer](/docs/integrations/nodemailer/) integration to deliver the email using a Gmail account. The integration configuration would be:
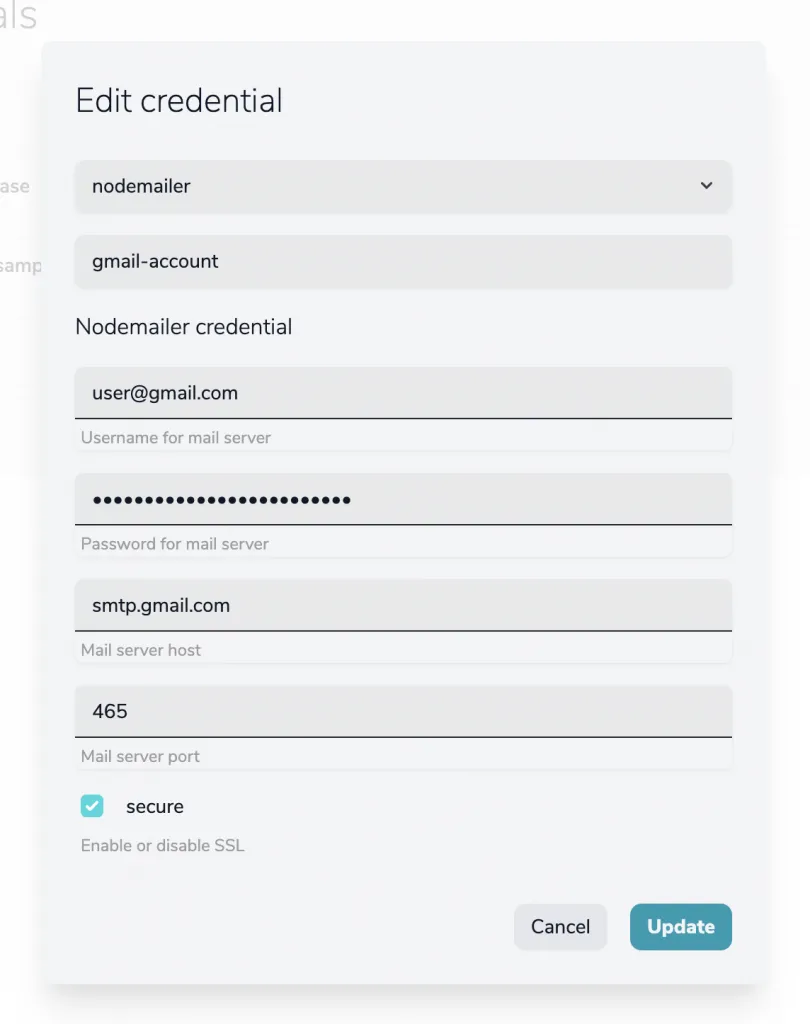
The last step is to **provide the** [**full source code**](/docs/processes/source-code/) that reads the input params. By using the created modules and the configured mail integration makes the full process. This source code would be:
This code example uses deprecated credentials:
```js
const mailClient = yepcode.integration.nodemailer('gmail-account')
```
Follow this [guide](/docs/credentials-migration-guide) to migrate your credentials.
```js
const {
context: { parameters },
} = yepcode;
const KrakenClient = yepcode.import('kraken-api-client');
const krakenHelper = yepcode.import('kraken-api-helper-methods');
const kraken = new KrakenClient(yepcode.env.KRAKEN_API_KEY, yepcode.env.KRAKEN_API_SECRET);
const validCashCurrencyCodes = ['USD', 'EUR', 'CAD', 'JPY', 'GBP', 'CHF', 'AUD'];
if (!validCashCurrencyCodes.includes(parameters.cashCurrencyCode)) {
console.error(`Invalid cashCurrencyCode ${parameters.cashCurrencyCode}. Valid values are ${validCashCurrencyCodes}`);
return;
}
const cashBalance = await krakenHelper.getBalance(kraken, parameters.cashCurrencyCode);
if (!cashBalance) {
console.error(`No available balance in ${parameters.cashCurrencyCode}`);
return;
}
console.log(`Current balance in ${parameters.cashCurrencyCode} is ${cashBalance}`);
const assetPairsByAltName = await krakenHelper.getCurrencyAssetPairsByAltName(kraken);
const altName = krakenHelper.getAltName(parameters.cashCurrencyCode, parameters.cryptoCurrencyCode);
const assetPair = assetPairsByAltName[altName];
if (!assetPair) {
console.error(`No assetPair found for alt name ${altName}. Available values are ${JSON.stringify(assetPairsByAltName)}`);
return;
}
const { tradingPair, orderMin } = assetPair;
console.log(`Trading pair to be used is ${tradingPair}`);
console.log(`Minimum order volume is ${orderMin}`);
let openOrdersRemovedAmount = 0;
if (parameters.closeOpenOrdersForThisCrypto) {
const openOrdersById = await krakenHelper.getOpenOrders(kraken);
console.log(`There already are ${Object.keys(openOrdersById).length} opened orders`);
for (const orderId in openOrdersById) {
const order = openOrdersById[orderId];
if (order.descr.pair == tradingPair) {
console.log(`Found order of pair ${tradingPair} to be closed: ${orderId}`);
const queryCancel = await krakenHelper.closeOrder(kraken, orderId);
console.log(`Order closed ${queryCancel}`);
openOrdersRemovedAmount++;
}
}
}
const currentPrice = await krakenHelper.getCurrentPrice(kraken, tradingPair);
console.log(`Current price of ${parameters.cryptoCurrencyCode} is ${currentPrice}${parameters.cashCurrencyCode}`);
const currentPriceAmountOfDecimals = currentPrice.toString().split(".")[1].length || 0;
let ordersToCreate = [];
if (parameters.marketOrderQuantity && parameters.marketOrderQuantity > 0) {
ordersToCreate.push({
pricePercentage: 1,
quantity: parameters.marketOrderQuantity
})
}
if (parameters.ordersBelowCurrentPrice) {
ordersToCreate = ordersToCreate.concat(parameters.ordersBelowCurrentPrice);
}
const createdOrders = [];
console.log(`Creating ${ordersToCreate.length} orders`);
for (const [i, order] of ordersToCreate.entries()) {
const { pricePercentage, quantity } = order;
if (pricePercentage < 0.01 || pricePercentage > 1) {
console.error(`Order ${i + 1} not created. Percentage must be in range 0.01 - 1`);
continue;
}
const putBid = parseFloat((currentPrice * pricePercentage).toFixed(currentPriceAmountOfDecimals));
const volume = quantity / putBid;
if (volume < orderMin) {
console.error(`Order ${i + 1} not created. Volume must be higher than ${orderMin} (attempt to use ${volume})`);
continue;
}
const totalCost = volume * putBid;
console.log(`Order ${i + 1} - Total cost ${totalCost}${parameters.cashCurrencyCode} / Price ${putBid}${parameters.cashCurrencyCode} / Amount ${volume}${parameters.cryptoCurrencyCode}`);
const newOrder = await krakenHelper.addOrder(kraken, tradingPair, putBid, volume);
const description = newOrder.result.descr.order;
const transactionId = newOrder.result.txid;
console.log(`New order created with id ${transactionId} (${description}))`);
createdOrders.push({
transactionId,
totalCost,
price: putBid,
volume
})
}
const mailHtmlContent = `
Your Kraken balance in ${parameters.cashCurrencyCode} is ${cashBalance}.
Current price of ${parameters.cryptoCurrencyCode} is ${currentPrice}.
${(openOrdersRemovedAmount > 0 ? `${openOrdersRemovedAmount} opened order for ${tradingPair} already existed, and have been removed.
` : '')}
${ordersToCreate.length} new orders have been created:
| Order id |
Total cost in ${parameters.cashCurrencyCode} |
Price in ${parameters.cryptoCurrencyCode} |
Amount in ${parameters.cryptoCurrencyCode} |
${createdOrders.map(({ transactionId, totalCost, price, volume }) => {
return `
| ${transactionId} |
${totalCost} |
${price} |
${volume} |
`;
}).join('')}
`
const mailClient = yepcode.integration.nodemailer('gmail-account')
await mailClient.sendMail({
from: "YepCode ",
to: "cryptobuyer@gmail.com",
subject: `YepCode DCA Bot - New orders for crypto ${parameters.cryptoCurrencyCode}`,
html: mailHtmlContent
})
console.log("Report email sent");
```
Having all this setup created, we could start a new on [demand execution](/docs/executions/on-demand/) of the process, **providing the requested parameters**:
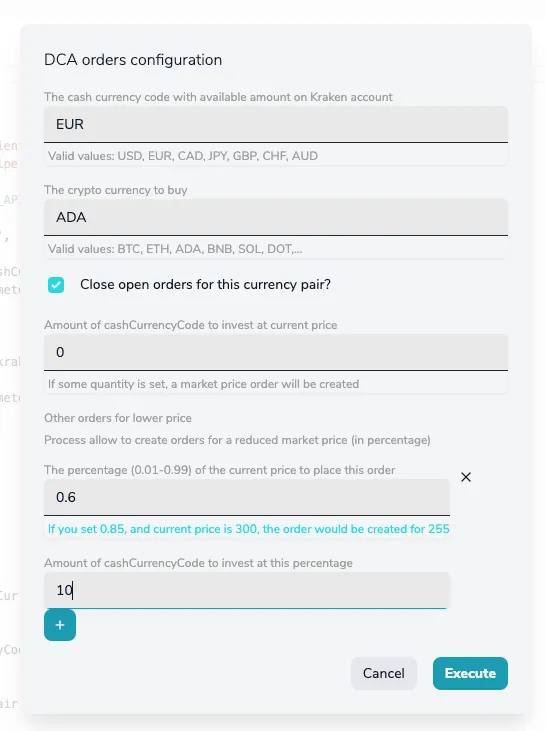
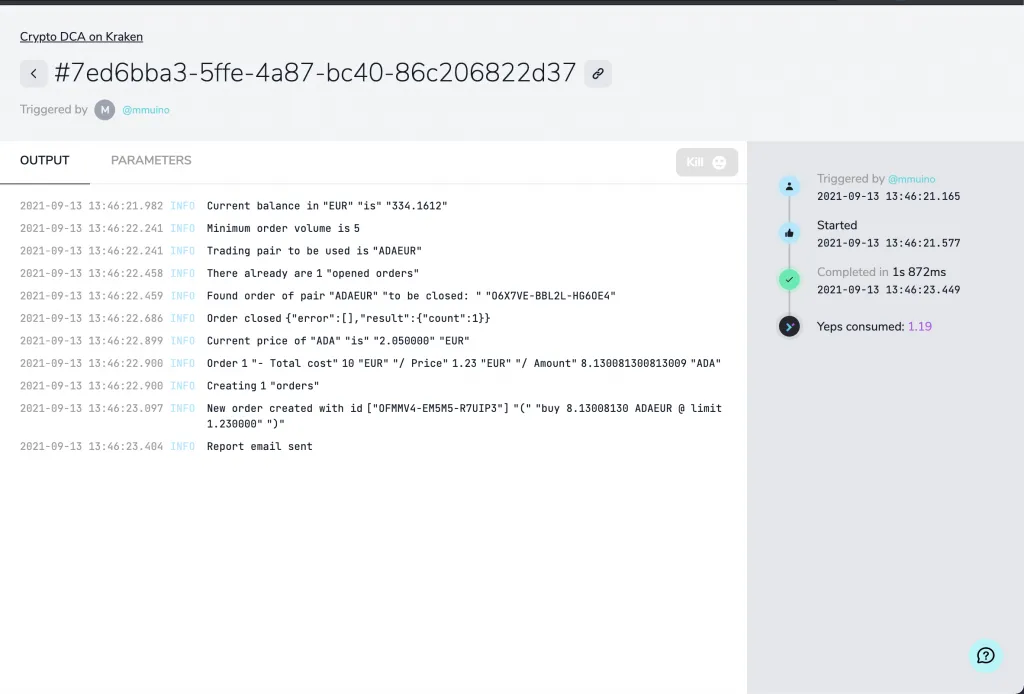
And navigation to the [process execution details](/docs/executions/), we could also see the log output and execution information:
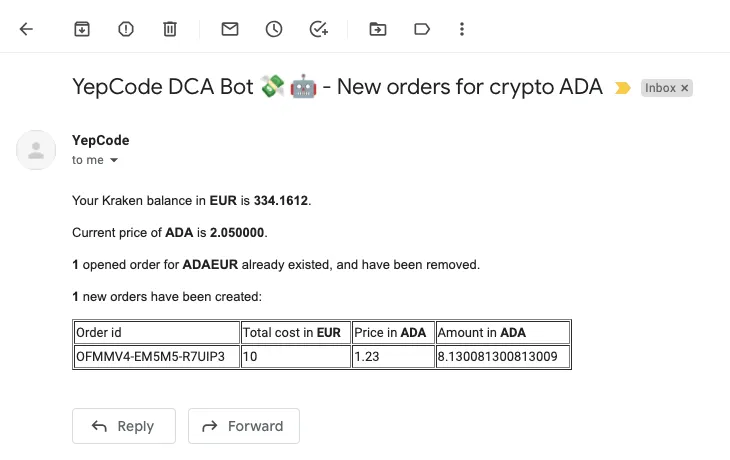
The used code is generating an email report, and the result for this execution is this one:
After being sure that everything works ok, and **having done some on-demand executions**, it’s time to create a [scheduled execution](/docs/executions/scheduled/) configuration to take the most of DCA. Let’s create a new periodic execution on Friday’s morning:
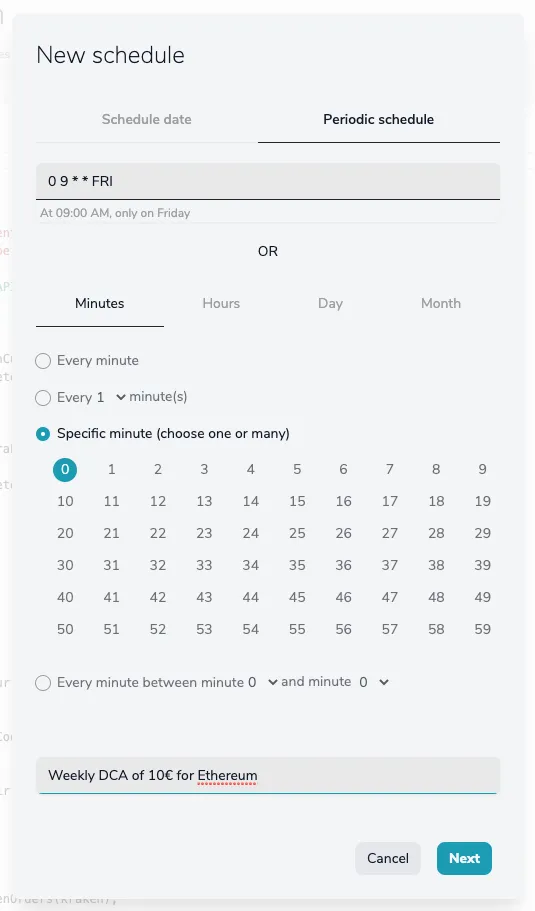
With the purpose of **buying 10€ of ETH**:
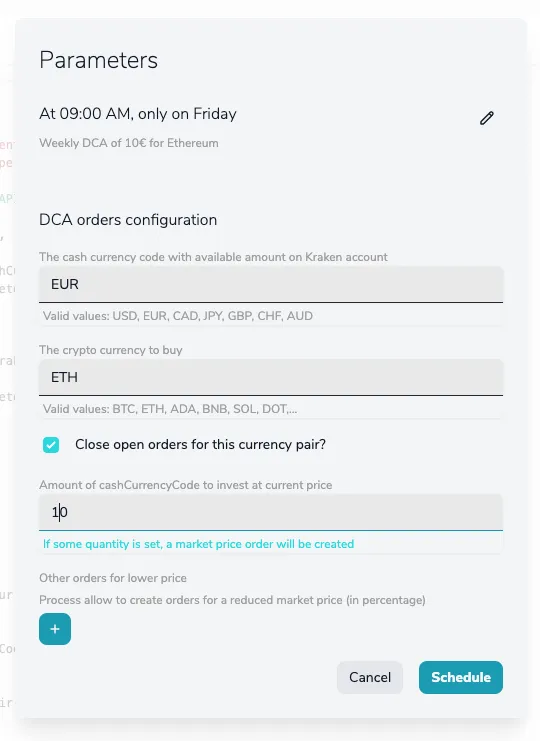
And that’s all!
With this post, we hope to have shown you **all the power that YepCode has** to solve your everyday programming problems.
# Why was YepCode created?
> YepCode is designed to help connect entire software applications together, allowing you to solve development problems in a very agile and productive way.
### Find out the history of YepCode and why we are going against the NoCode stream.
In this article, we are going to explain to you the reason why we created YepCode. Are you ready? Well, if you’ve made it this far, **Zapier, IFTTT, or Tray are probably familiar to you**. Don’t get us wrong. T**hey are** **excellent NoCode automation tools.** But they are just that, tools for the layman. Very nice and easy to use, **but with limitations**.
We have no doubt that, **if you know how to use code, you can be much more productive** and go one step further in your daily work.
Our team is made of software craftsmen and **YepCode is the result of our passion for writing source code**. We believe that this does not have to go against the aim of being agile and **getting our tasks done in a short time**.
That is why YepCode is our manifest. **Yep (Yes) + Code. We say yes to the code** and we defend everything it represents: craftsmanship, pampering, versatility, scalability, potential, quality.
### You know what it means, but … how did YepCode come about?
We think that **the idea of automating tasks by writing scripts** that would replace many manual workflows and interventions that were documented in a wiki, **is a huge win in any company.** This allows to **drastically reduce human errors,** being able to **schedule and monitor tasks** instead of having one user with access to the systems infrastructure doing the changes.
We are big fans of solving problems with tools like Zapier, n8n or even Amazon Lambda, but we don’t like some of the limits that each one has. With the full NoCode tools, **we may end in a mess when the problem to solve grows**, and the technical requirements are more complex. The Amazon Lambda, doesn’t have this problem but it’s **very tied to Amazon services** infrastructure.
So we decided to leave the developer all the flexibility to create processes, and We **chose one of our favourite programming languages (JavaScript)** as base for this new platform.
This allowed us to **achieve integrations** without the need to look for the best package. Without having to worry about where to **store the credentials** and being able to **monitor each execution**. And we created all this within a robust multitenant solution that **any client could use.**
### And all this, really of what use can it be?
We really think that **a platform that helps you solve the slow workflow** that occurs when starting a project from scratch, with source code repositories, environments, deployments, compilations, etc, is a very **useful tool**. YepCode can help you [**to solve many kinds of problems in a very effective way**](https://yepcode.io/)**.**
Tasks like streaming information from a [**MongoDb database**](/docs/integrations/mongodb/), merging it with more information retrieved from a [**GraphQL service**](/docs/integrations/graphql/), publishing each merged record to an [**MQ queue**](/docs/integrations/amqp/) and creating a **PDF file** that is then sent via email, are the **daily work of YepCode**.
We designed YepCode to **help connect entire software applications together.** Moving information between them, processing flows, chaining events, performing periodic tasks and reporting.
Without a doubt, **a great tool for code lovers**.