How to efficiently automate bulk data movement from Google BigQuery to Snowflake
Following the topic line of articles in which we explained in detail some practical examples of how to carry out different processes, automation and integrations with YepCode, today we are going to talk about how to automate the transfer of large volumes of data from Google BigQuery to Snowflake in the most efficient way.
Moving large amounts of data from Google BigQuery to Snowflake is not an agile duty
There are lots of NoCode ETL tools in the market that allow moving information between several data sources (both on-premise services or SaaS). But it’s a common problem that users can’t fully adapt those loading processes to all their needs.
Think, for example, in a scenario where information is generated every day in Google BigQuery (ie: Google Analytics events information). Imagine that you want to copy that information into a Snowflake database in a nightly process.
A mandatory requirement should be to copy only new events that have not been previously copied. Before going to BigQuery, you need to go to Snowflake to retrieve the last loaded date. This way you can use it later to build the BigQuery SQL sentence. Typically, this may be to check the max value of a date column or use a control table that tracks every load execution.
You may also need to be notified (with an email or a Slack notification) about how that load was performed (ie: reporting the number of new events loaded).
One last requirement could be take to into account that millions of events are generated every day. In that case, a simple approach of **running an SQL against BigQuery and for each row performing an insert in Snowflake may not work.**
// This is a bad approach to load millions of rows
const [job] = await bigqueryClient.createQueryJob({    query: `SELECT column1, column2 FROM table1`});const [rows] = await job.getQueryResults();
snowflakeClient.execute({    sqlText: 'insert into table1(column1, column2) values(?, ?, ?)',    binds: rows.map((row)=> [row.column1, row.column2]])});
We leverage Yepcode integrations to create the most effective workflow for this process
Under this situation, the flow we would propose using YepCode integrations would include these steps:
- Run a synchronous SQL select against Snowflake to get the last loaded date and also the current amount of events. We could use a reusable function for this syncExec approach and include it in one YepCode JS Module:
exports.snowflakeSyncExec = (snowflakeClient, sqlText, binds = [], rest = {}) => { return new Promise((resolve, reject) => { snowflakeClient.execute({ sqlText, binds, ...rest, complete: (err, stmt, rows) => { if (err) { reject(err); return; } resolve([stmt, rows]); }, }); });}- With that reusable function, the last loaded date and current amount of rows could be retrieved with something like:
const [, rows] = await snowflakeSyncExec(snowflakeClient, "SELECT MAX(DATE) AS LAST_LOADED_DATE, COUNT(1) AS ROWS_AMOUNT FROM table1");
const LAST_LOADED_DATE = rows[0].LAST_LOADED_DATEconst ROWS_AMOUNT = rows[0].ROWS_AMOUNT- Using the previously retrieved date, we could create a Google BigQuery SQL sentence to get the new events and execute that query in BigQuery.
- Instead of returning the rows, we’ll leave them in a Google Cloud Bucket with CSV format.
- To achieve this, we must use the export data feature, which may leave the rows returned by the query in a CSV file within Google Cloud Bucket (related docs).
- A piece of sample code could be:
const exportQuery =  `EXPORT DATA OPTIONS(  uri='gs://my-google-cloud-bucket-name/my-table-export-file_*',  format='CSV',  header=true,  compression='GZIP',  field_delimiter=',') AS  SELECT column1, column2 FROM table1 WHERE date > @last_loaded_date  `;
googleBigQueryClient.createQueryJob({ query: exportQuery, params: {last_loaded_date: LAST_LOADED_DATE}});- Note that this data export approach may be also used with GZIP compression to reduce network use.
- Having the query result exported in a file in the bucket, we can directly load that CSV file into Snowflake using a preconfigured stage. This is a lovely feature in Snowflake (related docs).
- The piece of code could be:
const importCSVSqlSentence =  `COPY INTO my_table_name  FROM @stage_for_google_cloud_bucket  PATTERN='my-table-export-file_.*';`;
snowflakeSyncExec(snowflakeClient, importCSVSqlSentence);- Having the new information loaded in Snowflake, we could remove the previously generaded CSV files. The Google Cloud Storage integration may help us:
googleCloudStorageClient.bucket('my-google-cloud-bucket-name').deleteFiles({ prefix: 'my-table-export-file_'});- As last step we could run another query in Snowflake to get the new number of events loaded and with that information, we could build a notification message and deliver it via email or with the slack integration (related docs).
- The piece of code to send that message could be:
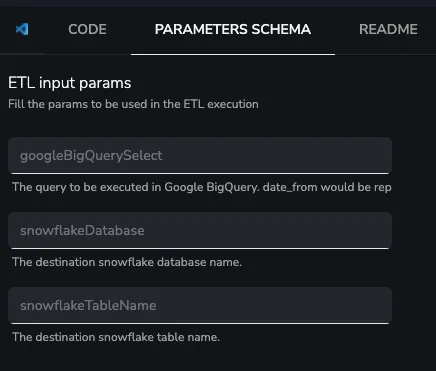
await slackBotClient.chat.postMessage({ channel: "bigQuery-snowflake-load", text: `Load successfully finished with ${rowsAmount} new rows copied!`,});To implement the full process in YepCode, you’ll need to configure a Google service account with access to the Google BigQuery and Google Cloud Bucket. Also, follow the guide in Snowflake to configure a stage that may be able to read information from that Bucket.Having that configuration created, the best option could be to create a generic process that could carry out the movement of information in a parameterized way, receiving these parameters:
- SQL sentence to execute in Google BigQuery (having the start load date as a parameter)
- SQL sentence to execute in Snowflake to retrieve the last loaded date and the number of events
- Snowflake destination database and table name