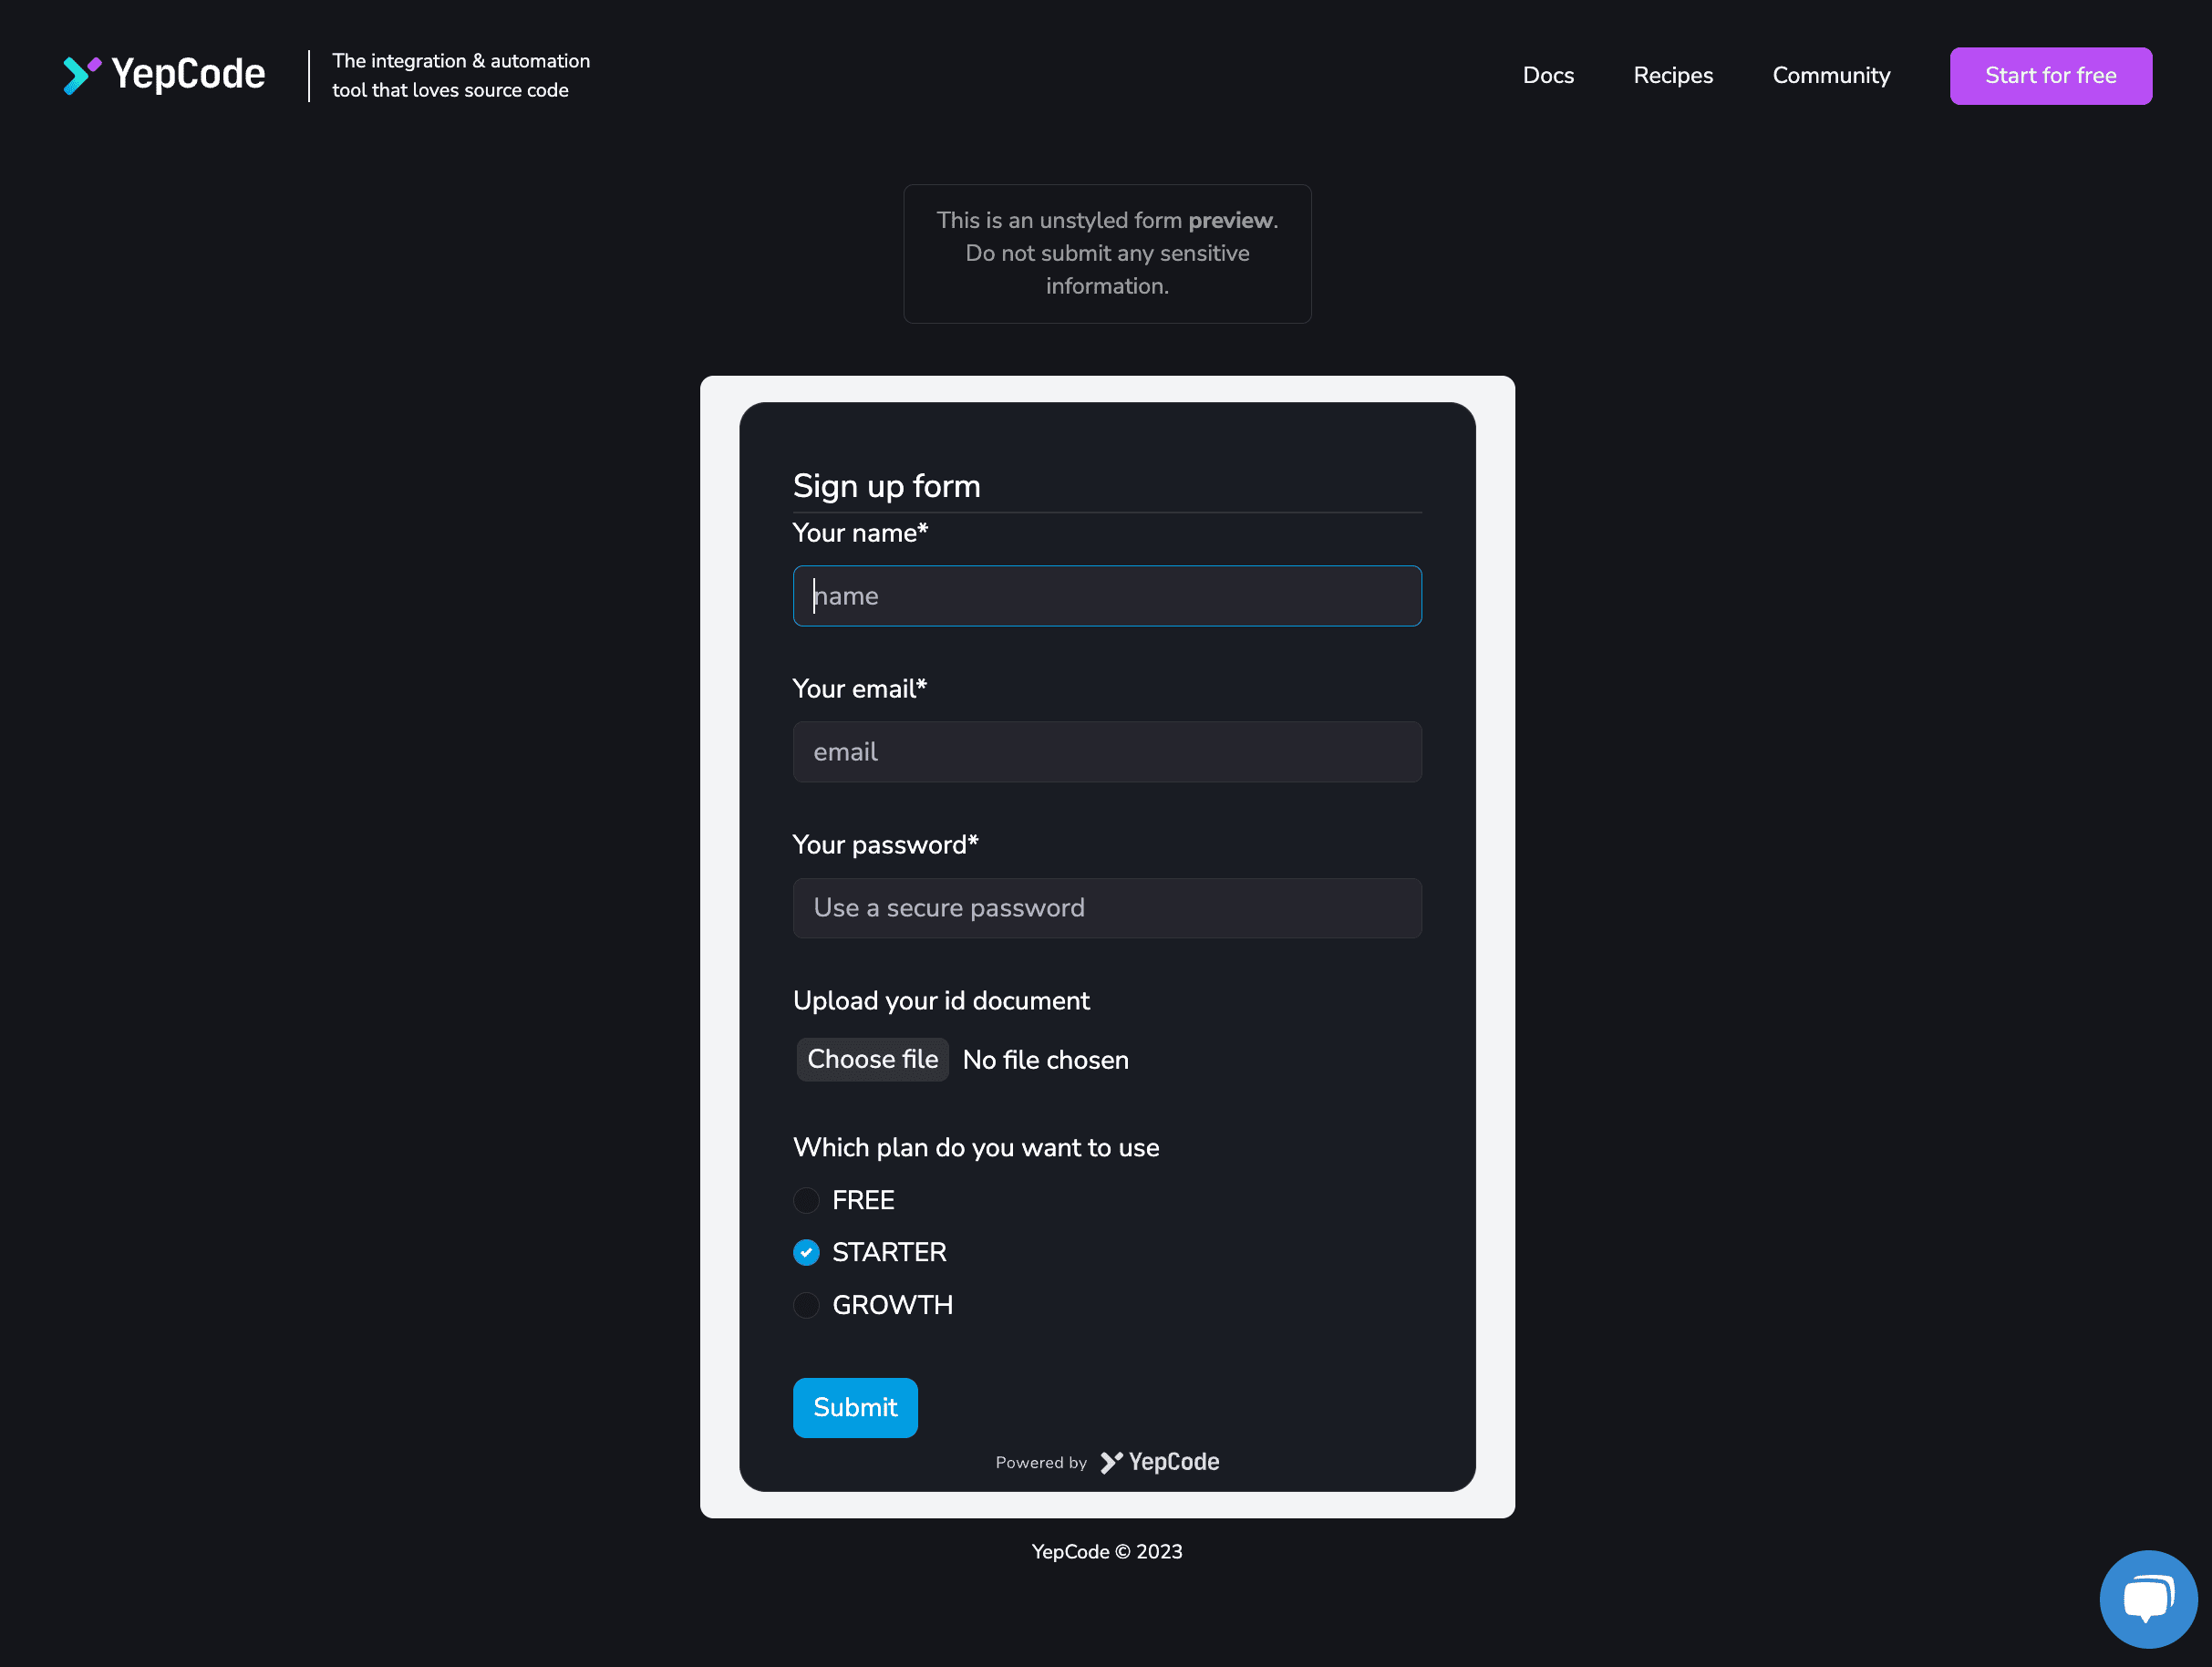
YepCode Forms
YepCode allows start process executions from any webpage embedding process input parameters forms.
This allows each form submission to start one execution with the information filled in the form, and also allows to manage the execution result into that webpage.

Quick start
The first step after having your YepCode process created and with a configured input parameters form, is to enable the forms feature for it.
Just visit the process Dashboard and enable the Forms
flag.

The URL that you'll see, allows you to visit a public page with your embebed form.
You may share this URL with anyone that you wants to start the related process execution.
We'll start showing how to embed the simplest version of one YepCode form, and then we'll go deeper with full form configuration.
Embed the form
There are two methods to embed a form in any external webpage:
- Using one JavaScript SDK that will replace DOM elements with forms
- Using the YepCodeForm ReactJS component
In both of them, you'll need your two mandatory parameters:
- yepcode-team-id: your team id, that it's available on your workspace url
https://cloud.yepcode.io/<yepcode-team-id>
- yepcode-process-id: your process id, that it's available on your process url
https://cloud.yepcode.io/<yepcode-team-id>/processes/<yepcode-process-id>
. A sample could befd7f9a83-2d3d-1af8-6c3f-b9caa68531b1
Method 1: Embed a form using our JavaScript SDK
The first step is to place this snippet into the head
tag of your website.
<script defer="defer" src="https://yepcode.io/sdk/forms.js"></script>
It may be loaded globally in your website, or just in the webpages where you want to embed forms.
- Init forms using data attributes
- Init forms using YepCode.initForm function
data-yepcode-form-team
and data-yepcode-form-process
and it will replace each element with the full form renderization.This would be the simplest version of one form:
<div
data-yepcode-form-team="<yepcode-team-id>"
data-yepcode-form-process="<yepcode-process-id>"
></div>
<div id="my-yepcode-form"></div>
<script>
YepCode.initForm("#my-yepcode-form", {
team: "<yepcode-team-id>",
process: "<yepcode-process-id>",
});
</script>
If you prefer to provide the DOM element itself, that also supported:
<div id="my-yepcode-form"></div>
<script>
YepCode.initForm(document.getElementById("my-yepcode-form"), {
team: "<yepcode-team-id>",
process: "<yepcode-process-id>",
});
</script>
Method 2: Embed a form using YepCodeForm
ReactJS component
- Install as NPM package using your favourite package manager:
yarn add @yepcode/react-forms
or
npm install --save @yepcode/react-forms
- Import the component and render it in your ReactJS app:
import YepCodeForm from "@yepcode/react-forms";
const MyComponent = () => {
return (
<YepCodeForm
team={"<yepcode-team-id>"}
processId={"<yepcode-process-id>"}
/>
);
};
If you are using some Server Side Rendering framework like NextJS, you have to use dynamic components with no SSR:
import dynamic from "next/dynamic";
const YepCodeForm = dynamic(() => import("@yepcode/react-forms"), {
ssr: false,
});
const MyComponent = () => {
return (
<YepCodeForm
team={"<yepcode-team-id>"}
processId={"<yepcode-process-id>"}
/>
);
};
Default behaviour
If you only set the team and processId, you'll get this default behaviour:
- YepCode form will start the process execution
- A loading overlay will be shown over the form during the execution with the message:
Sending information...
- If success:
- Response object will be logged in the JavaScript log console
- Form element will be replaced by a the message:
The form has been successfully submitted
- If error:
- Response object will be logged in the JavaScript error console
- Form element will be replaced by a the message:
There has been an error submitting the form
All of this may be extended with the following configuration:
Add success or error callback functions
You may provide a functions to manage the process execution response. This is quite powerfull as you could be for example retrieving records from one database, and then showing them to the user.
The syntax to set these functions in each approach would be:
- Using data attributes
- Using JavaScript function
- Using ReactJS component
<div
data-yepcode-form-team="<yepcode-team-id>"
data-yepcode-form-process="<yepcode-process-id>"
data-yepcode-form-on-success="(optional) HANDLER_FUNCTION_NAME"
data-yepcode-form-on-error="(optional) HANDLER_FUNCTION_NAME"
></div>
You should provide a JavaScript funcion name globaly available in the webpage (called with window.${functionName}
), and will be invoked passing the generated formId
, and the JSON result of the started execution. One sample could be:
<script>
window.manageOutput = (formId, jsonResponse) => {
document.getElementById("output").innerHTML = JSON.stringify(
jsonResponse,
2,
null
);
};
</script>
Same approach works for success and error callbacks.
<div id="my-yepcode-form"></div>
<script>
YepCode.initForm("#my-yepcode-form", {
team: "<yepcode-team-id>",
process: "<yepcode-process-id>",
onSuccess: (formId, data) => {
console.log(
`Form ${formId} has been successfully submitted. Received response was:`,
data
);
},
onError: console.error,
});
</script>
import YepCodeForm from "@yepcode/react-forms";
const MyComponent = () => {
return (
<YepCodeForm
team={"<yepcode-team-id>"}
processId={"<yepcode-process-id>"}
onSuccess={(formId, data) => {
console.log(
`Form ${formId} has been successfully submitted. Received response was:`,
data
);
}}
onError={console.error}
/>
);
};
Add initial form values
You may provide a JSON object that will be used to set initial values in the form. It may be specially interesting to set hidden fields values, as they won't be shown to the user.
The syntax to set these default values in each approach would be:
- Using data attributes
- Using JavaScript function
- Using ReactJS component
<div
data-yepcode-form-team="<yepcode-team-id>"
data-yepcode-form-process="<yepcode-process-id>"
data-yepcode-form-default-values='{
"company": "Trileuco Solutions",
"oneHiddenField": "the-value"
}'
></div>
<div id="my-yepcode-form"></div>
<script>
YepCode.initForm("#my-yepcode-form", {
team: "<yepcode-team-id>",
process: "<yepcode-process-id>",
defaultValues: {
company: "Trileuco Solutions",
oneHiddenField: "the-value",
},
});
</script>
import YepCodeForm from "@yepcode/react-forms";
const MyComponent = () => {
return (
<YepCodeForm
team={"<yepcode-team-id>"}
processId={"<yepcode-process-id>"}
defaultValues={{
company: "Trileuco Solutions",
oneHiddenField: "the-value",
}}
/>
);
};
Configure YepCode sync or async process execution
By default all process executions will be synchronous, but if you are working with a long time execution, we may just start it in an asynchronous approach and YepCode will respond instantly with 201 http code and a JSON informing about execution id.
The syntax to set these default values in each approach would be:
- Using data attributes
- Using JavaScript function
- Using ReactJS component
<div
data-yepcode-form-team="<yepcode-team-id>"
data-yepcode-form-process="<yepcode-process-id>"
data-yepcode-form-async="true"
></div>
<div id="my-yepcode-form"></div>
<script>
YepCode.initForm("#my-yepcode-form", {
team: "<yepcode-team-id>",
process: "<yepcode-process-id>",
async: true,
});
</script>
import YepCodeForm from "@yepcode/react-forms";
const MyComponent = () => {
return (
<YepCodeForm
team={"<yepcode-team-id>"}
processId={"<yepcode-process-id>"}
async={true}
/>
);
};
Appearance configuration
YepCode forms supports several appearance configurations to fit with your site styles.
This configuration must be provided using a JSON, and it may be also configured in the embed code or into the process input parameters configuraiton into the platform.
Options allow to change this appearance details:
- Used theme and stylesheets (see [#themes-and-styles])
- Version of
Powered by YepCode
branding logo - Disable the loading overlay
- Change the loading overlay text message
These are the methods to change this configuration:
- Configuration in YepCode Cloud:

Take into account that this configuration will apply to all instances of this embed form. If you want to override some of this configuration for one specific embed, use the following approaches as they override the configuration received from the platform.
- Using data attributes
- Using JavaScript function
- Using ReactJS component
<div
data-yepcode-form-team="<yepcode-team-id>"
data-yepcode-form-process="<yepcode-process-id>"
data-yepcode-form-options='
{
"theme": "material-ui",
"brandingLogo": "light",
"loadingOverlayDisabled": false,
"loadingOverlayContent": "Sending information..."
}'
></div>
<div id="my-yepcode-form"></div>
<script>
YepCode.initForm("#my-yepcode-form", {
team: "<yepcode-team-id>",
process: "<yepcode-process-id>",
options: {
theme: "material-ui",
brandingLogo: "light",
loadingOverlayDisabled: false,
loadingOverlayContent: "Sending information...",
},
});
</script>
import YepCodeForm from "@yepcode/react-forms";
const MyComponent = () => {
return (
<YepCodeForm
team={"<yepcode-team-id>"}
processId={"<yepcode-process-id>"}
options={{
theme: "material-ui",
brandingLogo: "light",
loadingOverlayDisabled: false,
loadingOverlayContent: "Sending information...",
}}
/>
);
};
Themes and styles
Each theme renders a specific DOM using some existing UI framework. Available themes are:
- default | material-ui: it uses Material UI framework.
- bootstrap-3: it uses the bootstrap framework v3.
- bootstrap-4: it uses the bootstrap framework v4.
- antd: it uses Ant Design framework.
- chakra-ui: it uses Chakra UI framework.
Some of the themes also load a custom CSS stylesheet, but you may skip that import setting the stylesheet
option to none
.
This configuration also allows you to load some external CSS file, for example you may use some bootswatch theme with this configuration:
<div
data-yepcode-form-team="<yepcode-team-id>"
data-yepcode-form-process="<yepcode-process-id>"
data-yepcode-form-options='
{
"theme": "bootstrap-3",
"stylesheet": "https://cdnjs.cloudflare.com/ajax/libs/bootswatch/3.3.6/cyborg/bootstrap.min.css"
}'
></div>
If need it, there are some CSS classes that wrap the form container (.yepcode-form-container
), and also the form itself (form.yepcode-form
).