YepCode CLI
Introduction
Section titled “Introduction”A Command Line Interface (CLI) is a text-based interface that enables users to interact with a computer program. YepCode provides both a Graphic User Interface (GUI), accessible at https://cloud.yepcode.io, and a CLI for interacting with YepCode Cloud.
YepCode CLI
Section titled “YepCode CLI”The YepCode Command Line Interface facilitates interaction with YepCode Cloud directly from your local workstation’s command line. It’s particularly useful if you prefer developing and testing processes’ source code locally rather than using the web IDE of YepCode Cloud.
By using YepCode CLI, you can employ version control systems like git to manage your code and synchronize your repository with YepCode Cloud. In essence, the CLI allows you to run commands such as clone to download all your team workspaces, run to test your code locally, and push to upload changes to YepCode Cloud.
Watch the video below for an overview of how YepCode CLI can be used (Spanish version):
Installation
Section titled “Installation”YepCode CLI is published on npmjs so just install it as any other nodejs package:
npm install -g @yepcode/cliAsk for help
Section titled “Ask for help”As with any other command-line tool, you can run the help command to display the list of available commands:
$ yepcode helpYepCode Command Line Interface
VERSION  @yepcode/cli/1.0
USAGE  $ yepcode [COMMAND]
COMMANDS  clone    Clone team processes  help     Display help for yepcode.  login    Login to the service  logout   Logout from service  ...
Login to your YepCode account
Section titled “Login to your YepCode account”Before interacting with your account, you need to log in. These credentials are personal and grant you access to your YepCode teams.
$ yepcode loginWhat is your yepcode password (not stored)?: **********🔑 Checking credentials... done👐 Hi, Ada Lovelace!You can provide your credentials using the credentials prompt, or you can use the --email and --password options.
$ yepcode login --email your-email --password your-passwordLogout from your YepCode account
Section titled “Logout from your YepCode account”Perform a logout to remove access to your YepCode account.
$ yepcode logout👋 Bye!Clone your team workspace locally
Section titled “Clone your team workspace locally”Clone one of your team workspaces using:
$ yepcode clone ada-lovelacefetching processes...
fetching modules...
fetching variables...
🎉  ada-lovelace team processes cloned successfully!
$ cd ada-lovelace$ yepcode clone🏢 Allowed teams: ada-lovelace sandboxInspect the generated folder, and you’ll see some folders and files:
📦 ada-lovelace┣ 📂 dependencies┃ ┣ 📜 package.json┃ ┣ 📜 requirements.txt┣ 📂 modules┃ ┣ 📂 <javascript-module-slug>┃ ┃ ┗ 📜 <module-slug>.js┃ ┣ 📂 <python-module-slug>┃ ┃ ┗ 📜 <module-slug>.py┃ ┣ 📂 <module-with-versions>┃ ┃ ┣ 📂 versions┃ ┃ ┃ ┣ 📂 v1.0┃ ┃ ┃ ┃ ┗ 📜 <module-slug>.js┃ ┃ ┃ ┗ 📂 ...┃ ┃ ┗ 📜 <module-slug>.js┃ ┗ 📂 ...┣ 📂 processes┃ ┣ 📂 <javascript-process-slug>┃ ┃ ┣ 📜 README.md┃ ┃ ┣ 📜 index.js┃ ┃ ┣ 📜 parametersSchema.json┃ ┃ ┗ 📜 parameters.json┃ ┣ 📂 <python-process-slug>┃ ┃ ┣ 📜 README.md┃ ┃ ┣ 📜 main.py┃ ┃ ┣ 📜 parametersSchema.json┃ ┃ ┗ 📜 parameters.json┃ ┣ 📂 <process-slug-with-versions>┃ ┃ ┣ 📂 versions┃ ┃ ┃ ┣ 📂 v1.0┃ ┃ ┃ ┃ ┣ 📜 README.md┃ ┃ ┃ ┃ ┣ 📜 index.js┃ ┃ ┃ ┃ ┣ 📜 parametersSchema.json┃ ┃ ┃ ┃ ┗ 📜 parameters.json┃ ┃ ┃ ┗ 📂 ...┃ ┃ ┣ 📜 README.md┃ ┃ ┣ 📜 index.js┃ ┃ ┣ 📜 parametersSchema.json┃ ┃ ┗ 📜 parameters.json┃ ┗ 📂 ...┣ 📜 datastore.json┣ 📜 variables.env┣ 📜 variables.local.env┣ 📜 .gitignore┗ 📂 .yepcodedependencies: Dependencies’ source code, containing both the python and javascript dependencies.package.json: It will be a json file with the dependencies for the javascript dependencies. Just the content of the inner dependencies field in any standard package (do not include thedependenciesfield). Sample:
{"axios": "^1.6.0","nodemailer": "^6.9.0"}requirements.txt: Python requirements.txt file with the dependencies for the python dependencies. Sample:
datarobot==3.5.2psycopg2-binary==2.9.10processes: Processes’ source code, with one folder per process, containing process files.README.md: Markdown file with the process description.index.jsorindex.py: Process source code in JavaScript or Python.parametersSchema.json: Parameters schema JSON file.parameters.json: Sample input file dynamically generated. It will be used as default input file in local executions, but you may provide another one.versions: if process has published versions, a new folder will exists and each version folder will have a process replica with the published contents.
modules: Modules’ source code, with one folder per module, containing the module file.versions: if module has published versions, a new folder will exists and each version folder will have a module replica with the published contents.
variables.env: Includes all team variables in .env file format (KEY=VALUE).variables.local.env: Local environment variables that overridevariables.env.datastore.json: YepCode datastore file..gitignore: Auto generated gitignore file. It will be used if you create a git repo for this directory to ignore sensitive resources (variables .env)..yepcode: YepCode workspace metadata directory.
Execute processes locally
Section titled “Execute processes locally”Execute a process locally using the run command:
$ yepcode run <process-slug>By default, the process is executed using the parameters.json file located in the process folder. You may provide another input params using the --parameters option:
$ yepcode run <process-slug> --parameters path/to/parameters.jsonRun a local webhook server
Section titled “Run a local webhook server”The http command starts a local HTTP server that replicates the same webhook environment that YepCode provides on the cloud, exposing also your forms schema. This lets you develop and test webhook-triggered processes directly on your workstation without any deployments.
$ yepcode httpAvailable flags:
| Flag | Default | Description |
|---|---|---|
-P, --port | 3000 | Port to listen on |
-l, --logLevel | DEBUG | Log level for process executions (DEBUG, INFO, WARNING, ERROR) |
--auth-user | — | Basic auth username |
--auth-password | — | Basic auth password |
-j, --jsonLogs | — | Output process logs as NDJSON |
# Start on default port 3000$ yepcode http
# Start on a custom port$ yepcode http --port 8080
# Protect the local server with basic auth$ yepcode http --auth-user admin --auth-password secret
Run integration tests
Section titled “Run integration tests”The test command lets you define and run test cases for your processes locally. Tests live alongside the process source code and verify that a process produces the expected output for a given set of inputs.
Scaffold tests for a process
Section titled “Scaffold tests for a process”Use test:scaffold to generate a starter test structure for a process:
$ yepcode test:scaffold my-processFolder structure
Section titled “Folder structure”processes/ my-process/ index.js tests/ variables.test.env ← optional: variable overrides for all tests testHooks.js ← optional: global setup/teardown hooks 01-basic/ input.json ← required: parameters passed to the process output.json ← optional: expected return value variables.test.env ← optional: variable overrides for this test only testHooks.js ← optional: per-test setup/teardown hooks 02-edge-case/ input.json output.json 03-invalid-input/ input.json error.json ← optional: expected failure (mutually exclusive with output.json)Test cases are discovered by scanning subdirectories of tests/ and run in alphabetical order — use a numeric prefix (01-, 02-, …) to control the sequence.
Running tests
Section titled “Running tests”# Run tests for all processes in the workspace$ yepcode test
# Run tests for a single process$ yepcode test my-process
# Show full process log output during test runs$ yepcode test --logLevel DEBUG my-processInput and output files
Section titled “Input and output files”input.json — passed as yepcode.context.parameters to the process, exactly like --parameters on yepcode run:
{ "userId": 42, "format": "csv" }output.json — the expected return value. Comparison is exact deep equality — every key must match. If omitted, the test only checks that the process runs without throwing (smoke test):
{ "rows": 5, "status": "ok" }error.json — use instead of output.json when the process is expected to fail. output.json and error.json are mutually exclusive:
{}{ "message": "User not found" }An empty object asserts only that the process fails. Adding a "message" key asserts the error message contains that substring (case-sensitive).
Variable overrides
Section titled “Variable overrides”Variables are resolved in the following priority order (highest wins):
- Per-test
tests/{name}/variables.test.env - Global
tests/variables.test.env - Workspace
.env.local - Workspace
.env
# tests/variables.test.env — override DB for all testsDB_URL=postgres://localhost/test_db# tests/02-auth-check/variables.test.env — override for one specific testAPI_KEY=test-only-keyHooks let you seed data, reset state, or clean up external resources around test execution. Export before, after, or both from a testHooks.js (or testHooks.py) file. Inside hooks you have full access to yepcode.env, yepcode.datastore, yepcode.processes, and all other SDK features.
- Global hooks (
tests/testHooks.js) run once around the entire suite —beforebefore the first test,afterafter the last. - Per-test hooks (
tests/{name}/testHooks.js) run around each individual test.
module.exports.before = async function before() {  await yepcode.datastore.set('counter', '0')}
module.exports.after = async function after() { await yepcode.datastore.del('counter')}def before(): yepcode.datastore.set("counter", "0")
def after(): yepcode.datastore.del_("counter")Test output
Section titled “Test output”Testing my-process (3 tests) ✓ 01-basic (245ms) ✓ 02-edge-case (312ms) ✗ 03-error-path Expected: {"status":"error"} Received: {"status":"ok","message":"unexpected success"}
2 passed, 1 failed
────────────────────────────────────────────────Total: 3 tests — 2 passed, 1 failedManage package dependencies
Section titled “Manage package dependencies”YepCode support custom dependencies to use any npmjs or pypi package in your processes. Check dependencies section for more information.
In order to run a process, you need to install your team configured dependencies. You can do that with the dependencies command:
$ yepcode dependencies [all|javascript|python]There are two flags to manage dependencies:
--check: Check if dependencies are installed and installed versions are up to date.--reset: Performs a full reinstall of configured dependencies.
Pull changes from cloud
Section titled “Pull changes from cloud”If you or your colleages have performed changes in YepCode cloud, update your local files.
Fetch all processes from cloud and save them locally:
$ yepcode pullfetching processes...- [new]     -> Create process name (<process-slug>)- [updated]  -> Updated process name (<process-slug>)- [deleted]  -> Deleted process name (<process-slug>)
modules are up to date.
variables are up to date.Push changes to cloud
Section titled “Push changes to cloud”After upgrading your processes or modules locally, update your cloud workspace from local changes using push command.
$ yepcode pushuploading processes...[uploaded] -> modified-process-name (<process-slug>) uploaded to remote.[overwritten] -> conflictive-process-name (<process-slug>) overwritten in remote.Add local created resources
Section titled “Add local created resources”If you have created resources on your local workspace, you can add them to keep track and after that they could be pushed to remote:
ℹ️ 1 processes only existing in local: a-new-local-process Use command 'yepcode processes:add' to keep track of these resourcesUsing the yepcode processes:add command, it will be added and then will be shown in the status log.
Add new remote cloud team
Section titled “Add new remote cloud team”YepCode CLI is able to work with multiple remotes. This is pretty interesting to keep sync processes or modules between those environments.
Let’s say that you have a YepCode staging enviroment where you test your code before going to production. You cloud clone the staging environment and then add a new remote for the production envinroment. This is done with the yepcode remote command:
$ yepcode remoteAdd a remote team workspace
USAGE  $ yepcode remote:COMMAND
COMMANDS  remote:add  Add a remote team workspace  remote:set  Set the active remote team workspace
After adding a new remote, it may be needed to perform a yepcode add just to keep track of the files in this new environment. After that, you could go with a yepcode push to deploy changes to the cloud.
Resource topics
Section titled “Resource topics”Each workspace resource has a dedicated topic, allowing you to manage your workspace resources independently using topics (modules, processes, variables):
| Topic/Command | status | pull | push |
|---|---|---|---|
| processes | :white_check_mark: | :white_check_mark: | :white_check_mark: |
| modules | :white_check_mark: | :white_check_mark: | :white_check_mark: |
| variables | :white_check_mark: | :white_check_mark: | :sparkles: (just create) |
List resources
Section titled “List resources”You may list all available resources using the status command:
$ yepcode processes:status
processes status: slug                           name                               status ────────────────────────────── ────────────────────────────────── ──────────────── hello-world                    Hello world                        ✅  (up-to-date) stripe-customers-from-supabase Stripe Customers From Supabase Bar ✅  (up-to-date)
Pull resources changes from cloud
Section titled “Pull resources changes from cloud”In addition, you can fetch resources from the cloud and update locally:
$ yepcode processes:pullfetching processes...processes are up to date.Push resources changes to cloud
Section titled “Push resources changes to cloud”You can update cloud resources with local changes:
$ yepcode modules:pushupdating modules...modules up-to-dateDebug with visual studio code
Section titled “Debug with visual studio code”You can debug your yepcode processes using vscode.
In order to have full debugging support you need to encapsulate your code in a main() function:
const { yepcode } = require('yepcode');
async function main() {  // your code}
module.exports = { main };from yepcode import yepcode, logger
def main(): # your codeThen you need to create the vscode configuration files. You can do it with the setup-debug command:
$ yepcode setup-debug✨ Created .vscode/launch.json✨ Created .vscode/settings.jsonNow in your vscode Run and Debug tab you can select which process you want to debug:
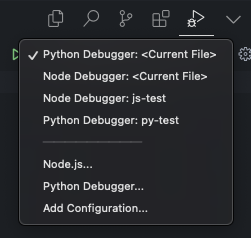
- The first two entries will debug your current file, you need to select Python/Node Debugger option depending on the language of your process.
- Next entries will be your processes, you can select one of them to debug.
Update CLI
Section titled “Update CLI”If you want to update the CLI, you can do it using the npm install command:
$ npm install -g @yepcode/cliIf a new version is available, you will be notified to update the CLI.
$ yepcode --version
      __     __         _____          _      \ \   / /        / ____|        | |       \ \_/ /__ _ __ | |     ___   __| | ___        \   / _ \ '_ \| |    / _ \ / _` |/ _ \         | |  __/ |_) | |___| (_) | (_| |  __/         |_|\___| .__/ \_____\___/ \__,_|\___|                | |                |_|
      Update available x.y.z → X.Y.Z      Run `npm i -g @yepcode/cli` to update
@yepcode/cli/x.y.z darwin-x64 node-v16.x.x