Webhook Executions
Webhooks are endpoints that you can provide to other external ecosystems.
This is very handy because it allows you to trigger process executions from external systems.
Configuration
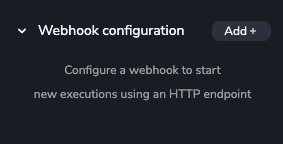
Section titled “Configuration”From the process page, you may find the Webhook configuration section on the right sidebar.
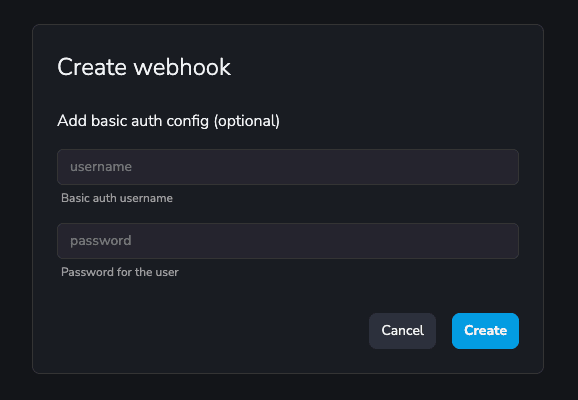
Once you press the Add + button, you can create a webhook passing optional authentication params. If you don’t provide a user and password, no authentication would be needed to start the process, so take care about it!
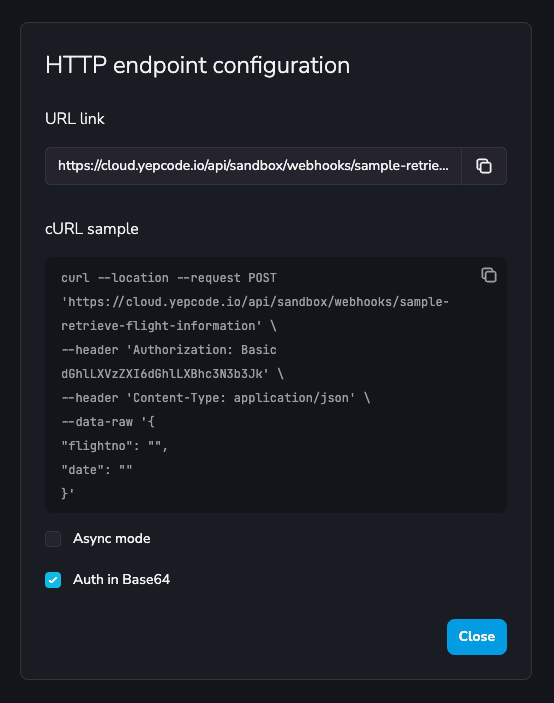
After creating the webhook, you can see:
- The generated URL link, points to the process using its Slug, which you can configure.
- The cURL command.
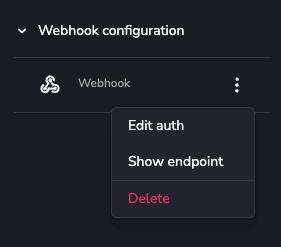
Now in the process Webhook configuration section you’ll see the created webhook. From the options menu you can:
- Update the previously created auth in
Edit auth - See the URL link and cURL command in
Show endpoint(also by clicking on the webhook itself).
Congrats! Your webhook is ready for external requests.
Invoking Webhooks Externally
Section titled “Invoking Webhooks Externally”Make an HTTP GET or POST to test your configured webhook, use a tool like Postman, Insomnia or curl in your terminal.
Payloads passed from the request body are included in YepCode parameters.
For example, this implementation would perform echoes from provided parameters:
// my echo processconst {  context: { parameters },} = yepcode;
return parameters;
# my echo processparameters = yepcode.context.parameters
return parameters;Invoke it using curl from the terminal with some parameters:
curl -X GET -H "Content-Type: application/json" \https://cloud.yepcode.io/api/your-team/webhooks/your-process-slug?name=John%20Doe# {"name":"John Doe"}The same example using POST, parameters in POST are passed as request body:
curl -X POST -H "Content-Type: application/json" -d '{"name": "John Doe"}' \https://cloud.yepcode.io/api/your-team/webhooks/your-process-slug# {"name":"John Doe"}Request Context
Section titled “Request Context”When a webhook is invoked, YepCode provides access to the request context through yepcode.context.request. This object includes:
headers: The request headers.rawBody (Js) / raw_body (Py): The request raw body.query: The request query parameters.method: The request method.
const { context: { request: { headers, rawBody, query, method } },} = yepcode;request = yepcode.context.request
headers = request.get("headers", {})raw_body = request.get("raw_body", "")query = request.get("query", "")method = request.get("method", "")For example, we could send a header signature to improve our process security:
curl --location --request POST 'https://cloud.yepcode.io/api/your-team/webhooks/your-process-slug' \--header 'Content-Type: application/json' \--header 'YepCode-Signature: yp_test_y4Fb38t5RngUZiZSzFC4c4lZHFKHcC'And validate that signature matches in the process:
const {  context: { request },} = yepcode;
if (  request.headers["yepcode-signature"] !==  "yp_test_y4Fb38t5RngUZiZSzFC4c4lZHFKHcC") {  return {    status: 400,    body: {      error: {        message:          "Invalid signature. Double check the 'YepCode-Signature' header",      },    },  };}
request = yepcode.context.request
if request.get("headers", {}).get("yepcode-signature", "") != "yp_test_y4Fb38t5RngUZiZSzFC4c4lZHFKHcC": return { "status": 400, "body": { "error": { "message": "Invalid signature. Double check the 'YepCode-Signature' header", }, }, };For better security, you can verify signatures using the raw body content. This approach ensures the integrity of the entire payload by creating a hash of the request body:
SECRET_KEY="your-secret-key"PAYLOAD='{"name": "John Doe", "amount": 100}'# Generate a signature with your secret key using HMAC-SHA256SIGNATURE=$(echo -n "$PAYLOAD" | openssl dgst -sha256 -hmac "$SECRET_KEY" | sed 's/^.* //')
curl --location --request POST 'https://cloud.yepcode.io/api/<your-team>/webhooks/<your-process-slug>' \--header 'Content-Type: application/json' \--header "X-Signature-SHA256: sha256=$SIGNATURE" \--data-raw "$PAYLOAD"
And validate the signature in your process:
const crypto = require("crypto");
const {  context: { request },} = yepcode;
const secretKey = process.env.WEBHOOK_SECRET_KEY; // Store your secret securely with YepCode team variablesconst receivedSignature = request.headers["x-signature-sha256"];const expectedSignature = `sha256=${crypto  .createHmac("sha256", secretKey)  .update(request.rawBody)  .digest("hex")}`;
if (receivedSignature !== expectedSignature) {  return {    status: 401,    body: {      error: {        message: "Invalid signature. Payload integrity check failed.",      },    },  };}
return {  status: 200,  body: {    message: "Signature verified successfully",  },}
import hmacimport hashlibimport os
def main(): # Store your secret securely with YepCode team variables secret_key = os.getenv("WEBHOOK_SECRET_KEY")
request = yepcode.context.request received_signature = request.get("headers", {}).get("x-signature-sha256", "") expected_signature = f"sha256={hmac.new(secret_key.encode(), request.get('raw_body', '').encode(), hashlib.sha256).hexdigest()}"
if received_signature != expected_signature: return { "status": 401, "body": { "error": { "message": "Invalid signature. Payload integrity check failed.", }, }, }
return { "status": 200, "body": { "message": "Signature verified successfully", }, }There are also some predefined headers that you can use to control the execution of your process:
- Yep-Version-Tag: Specify your process version tag to run a concrete version of your process. (optional)
- Yep-Async: Choose to run the webhook synchronously or asynchronously. Sync executions will wait the process to finish before returning the response, while async executions will respond instantly with 201 HTTP code and a JSON informing about execution id. (optional) default:false
- Yep-Initiated-By: Provide an additional level of abstraction to identify who is initiating requests to the YepCode endpoints. Its value will be recorded and can be consulted in the audit events. This allows clients to track and review the specific initiators of API requests for auditing and compliance purposes. It is optional and can be used in addition to the standard user authentication. (optional)
- Yep-Agent-Pool: If your team has configured more than one Agent Pool you can specify in which one the process will execute. Otherwise, the default pool will be used. (optional)
- Yep-Comment: The comment for the new execution. (optional)
Query Parameters
Section titled “Query Parameters”- async: Same as Yep-Async header. It takes precedence over the header. (optional) default:false
- async_response: Customize the response body for async webhook executions. When provided, this content will be returned as the response body instead of the default JSON. Set to
falseto return no body. (optional)
Custom Async Response Body
Section titled “Custom Async Response Body”By default, async webhook executions return a JSON response like this:
{"id":"cb045e6a-48e4-4bc4-a7be-a09bca0ffbe5","status":"CREATED","data":null}However, you can customize this response by using the async_response query parameter. This allows you to provide a custom message or content that will be returned as the response body instead of the default JSON.
Examples:
# Custom response messagecurl -X POST "https://cloud.yepcode.io/api/your-team/webhooks/your-process-slug?async=true&async_response=Working%20on%20it"# Response: Working on it
# No response bodycurl -X POST "https://cloud.yepcode.io/api/your-team/webhooks/your-process-slug?async=true&async_response=false"# Response: (empty body)
# Default behavior (no async_response parameter)curl -X POST "https://cloud.yepcode.io/api/your-team/webhooks/your-process-slug?async=true"# Response: {"id":"cb045e6a-48e4-4bc4-a7be-a09bca0ffbe5","status":"CREATED","data":null}Response Headers
Section titled “Response Headers”When you start executions using a webhook, you may want to set some headers in the response to the client. This can be useful to inform the client about the execution status, or to provide a link to the execution details.
This can be done by setting the response headers in the process code:
return { status: 201, // The HTTP status code to return to the client headers: { your-custom-header: "the-header-value" // The header to return to the client }, body: { message: "Any other response body" // The response body to return to the client }}return { "status": 201, # The HTTP status code to return to the client "headers": { "your-custom-header": "the-header-value" # The header to return to the client }, "body": { "message": "Any other response body" # The response body to return to the client }}There are also some predefined headers that you can use to control the execution of your async process execution:
- Yep-Execution-ID: All requests to webhooks returns this header indicating the execution id.
- Location header: Async executions return this header indicating the location of the execution.
Tips & Examples
Section titled “Tips & Examples”Here you have some sample requests with a sandbox process:
curl --location --request POST 'https://cloud.yepcode.io/api/sandbox/webhooks/sample-process-versions' \--header 'Yep-Async: true'curl --location --request POST 'https://cloud.yepcode.io/api/sandbox/webhooks/sample-process-versions?async=true' \curl --location --request POST 'https://cloud.yepcode.io/api/sandbox/webhooks/sample-process-versions' \--header 'Yep-Version-Tag: v1.0.0' \--header 'Yep-Async: false'curl --location --request POST 'https://cloud.yepcode.io/api/sandbox/webhooks/sample-process-versions' \--header 'Yep-Async: false'curl --location --request POST 'https://cloud.yepcode.io/api/sandbox/webhooks/sample-process-versions?async=false' \curl --location --request POST 'https://cloud.yepcode.io/api/sandbox/webhooks/sample-process-versions' \--header 'Yep-Comment: execution-comment'