Understanding Source Code in Processes
In the YepCode editor, users can craft the code to implement their processes.
Depending on the language selected, the script is executed in a specific engine:
- We use the
NodeJS
v22 engine. This allows you to utilize nearly all functions supported by NodeJS.
The code is wrapped in an
asyncfunction, enabling the use ofawaitthroughout the function. - We use the Python v3.13 engine. This supports the use of almost all functions provided by Python.
For those who prefer not to reinvent the wheel, explore the team dependencies to take advantage of any NPM or PyPI package.
To combat the challenge of spaghetti code, we’ve included a module to create and use your own Modules.
The source code editor supports key shortcuts, code formatting, and autocomplete features. If you start typing YepCode..., you’ll see some useful snippets.
The process source code is executed sequentially.
As with any other script, you can define functions and structure your code with good practices. Please follow the principles of clean code.
Internal Helpers
Section titled “Internal Helpers”YepCode allows you to use information from the current execution in your process.
Access to Execution and Process Info
Section titled “Access to Execution and Process Info”The basic information available for all executions includes the id of the current execution, the comment (if you wrote one), and the id and name of the process being executed. The code to obtain them would be:
const { id, comment } = yepcode.execution;
const { id: processId, name: processName } = yepcode.execution.process;id, comment = yepcode.execution.id, yepcode.execution.comment
processId, processName = yepcode.execution.process.id, yepcode.execution.process.nameAccess to Scheduled Process Info
Section titled “Access to Scheduled Process Info”When you schedule a process, you also have access to the id of the schedule and its comment (if it exists). The code to obtain them would be:
const { id: scheduleId, comment: scheduleComment } = yepcode.execution.schedule;scheduleId, scheduleComment = yepcode.execution.schedule.id, yepcode.execution.schedule.commentBuild Execution Link
Section titled “Build Execution Link”An interestion use case for this information is to build the exact execution link to send it by email:
const executionLink = `https://cloud.yepcode.io/{your-team-slug}/executions/${yepcode.execution.id}`;executionLink = f"https://cloud.yepcode.io/{your-team-slug}/executions/{yepcode.execution.id}"Access to Team Timezone
Section titled “Access to Team Timezone”You can access the current timezone set in your team. The code to do it would be:
const timezone = yepcode.team.timezone;timezone = yepcode.team.timezoneRun another process asynchronously
Section titled “Run another process asynchronously”Execute a process asynchronously within the same execution.
yepcode.processes.run(process-identifier [, options]);process-identifier: The process uuid or slug to run.options:parameters: An object containing the parameters to pass to the process. (optional)tag: Specify a process version tag to run a concrete version of your process. (optional)comment: A comment for the new execution. (optional)settings: An object containing the settings to pass to the process. (optional)
yepcode.processes.run("hello-world", { parameters: { name: "Jane Doe", }, tag: "latest", comment: "Running hello-world from execution", settings: { agentPoolSlug: "eu-west-1", },});yepcode.processes.run("hello-world", { "parameters": { "name": "Jane Doe", }, "tag": "latest", "comment": "Running hello-world from execution", "settings": { "agentPoolSlug": "eu-west-1", },})Return Value
Section titled “Return Value”YepCode allows your processes to return a value. This is very insteresting, especially when starting executions using webhooks or forms. You could manage this result value in your client. The syntax to return one object would be:
return { message: "Hello from YepCode!" };return { "message": "Hello from YepCode!" };You can view it on the execution detail page and also utilize it with the sync webhooks feature.
Return Custom Status Codes
Section titled “Return Custom Status Codes”Custom status code and a custom message are also supported. This is useful in many cases, but the most common one is probably error handling. For example, if you want to return a 404 error, but don’t want the execution to end in an error status.
To do that, you just need to return an object with the following structure:
try { // simulate an error throw new Error("Oops! Something went wrong.");} catch (e) { return { status: 418, body: { error: { message: e.message, stack: e.stack, }, }, headers: { "X-Custom-Header": "I am a custom header", }, };}import traceback
try: # simulate an error raise Exception("Oops! Something went wrong.");except Exception as e: return { "status": 418, "body": { "error": { "message": e, "stack": traceback.format_exc(), }, }, "headers": { "X-Custom-Header": "I am a custom header", }, };The magic lies in status, body and headers properties.
Transient Return Values
Section titled “Transient Return Values”In some cases, you may want to not store the return value of your process, for example, when sensitive data is returned.
For this cases, YepCode allows you to set a result as transient, so this result is not stored in the database.
For these cases, the stored result will be the [transient] replacement.
To make a result transient, just follow this structure:
return { isTransient: true, body: { foo: "bar" },};Of course, you can combine this with previously shown properties. For example:
return { isTransient: true, status: 201, body: { foo: "bar" }, headers: { "X-Custom-Header": "I am a custom header", },};return { "isTransient": True, "body": { "foo": "bar" },};Of course, you can combine this with previously shown properties. For example:
return { "isTransient": True, "status": 201, "body": { "foo": "bar" }, "headers": { "X-Custom-Header": "I am a custom header", },};Logging
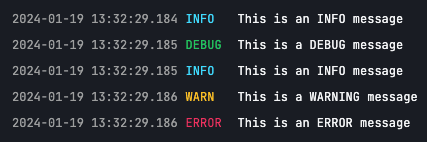
Section titled “Logging”YepCode allows to generate log entries that can be seen then in execution detail view.
In JavaScript you may use the console logger methods:
console.log(`This is an INFO message`);console.debug(`This is a DEBUG message`);console.info(`This is an INFO message`);console.warn(`This is a WARNING message`);console.error(`This is an ERROR message`);In Python the log level is set to WARNING, but YepCode exposes a logger object that has DEBUG level, so you may use it. The print method also generates a INFO log message:
print("This is an INFO message");logger.debug("This is a DEBUG message");logger.info("This is an INFO message");logger.warn("This is a WARNING message");logger.error("This is an ERROR message");This is how you’ll see the logs in the execution detail: